|
Making scenery: Egyptian stone temples and ruins
|
|
Making scenery: Egyptian stone temples and ruins
|
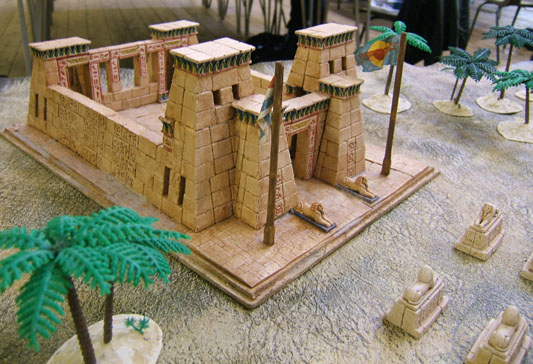
| Here is the pylon building, the design of which is very close to the one proposed by Hirst Arts. The base board is very strong and stiff and is made from two rectangles of hardboard, glued very thoroughly together with PVA glue. The bottom one is slightly bigger, to create the effect of steps. I added a paved texture to this by buying some flagstone-textured plastic card by Wills, and making a latex mould of one oblong section of this, and then casting enough copies to cover the base (using the plastic card would have been prohibitively expensive). |
|
|
I saw reconstructions of pylon buildings with huge flagpoles in front of them, and so made two flagpoles out of chopsticks and set them into Milliput-lined holes as you see here. Unfortunately, I later saw other reconstructions pictured from different angles, and these showed the flagpoles set into recesses at the bottom of the walls themselves, rather than straight into the ground as I have modelled. Oh well. The flags themselves are made out of cloth soaked in superglue (see banners). I have never seen a picture of a building like this one, so it could be that the design is largely fanciful. The front entrance wall, with its sloping walls and towers and slit-windows, is just like pylons one sees in reconstructions of ancient Egyptian towns, but these pylons are really just gateways in long walls, astride roads, and not part of self-contained enclosed buildings like this. A model like this, though, is easier to use and store. |
|
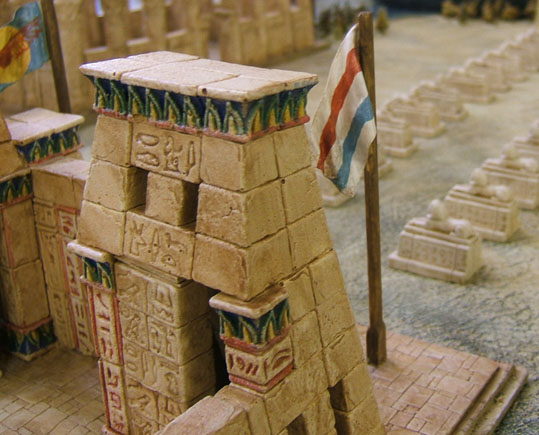
I decided to paint this one as though it had been spruced up a bit, but not as a pristine new building. I didn’t paint the hieroglyphs in the walls, but a lot of the other details I painted with bright primitive colours. Before I was finished, the model looked a bit like a building made for a children’s playground. I didn’t need to be very precise with my coloured paint, because of what I planned to do next. I dry-brushed over the top of the coloured paint, which made it look sand-worn and sun-bleached, and then varnished over that, covering the imprecise paint-job in the recesses. |
|
This close-up shot gives you a better idea of the effect of the paint job. You can also see one of my modifications to the Hirst Arts design – a vertical wall that offers support to the tower, which would otherwise has been left hanging in a rather unconvincing way. As with the other models, I had some problem getting the varnish on the base to dry matt. I found that on the flagstones I could scrub away the gloss using a stiff brush loaded with a mix of plaster and brown paint. It scoured the gloss away rather than coating it. |
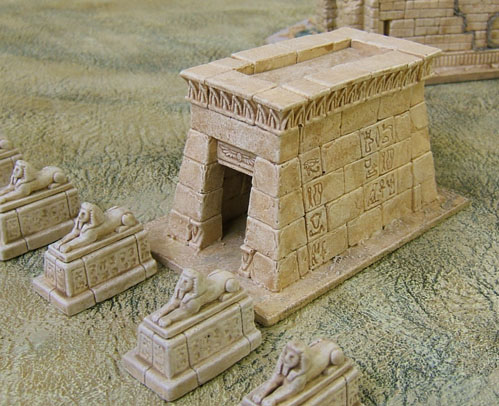
| I made this little building out of pieces left over. At the base of the doorway you see two of the smallest roof-edging pieces used upside down. The lintel stone, with its winged sun motif, I glued in recessed. Had I not done this, the fact that it had no visible means of support would have been very obvious. One can imagine that there is some arrangement of stone inside that supports it. The roof is a strip of card, textured with plaster. The base is hardboard. What is this building? It could be a Nileometer (a covered stairway down into the ground to see where the water level of the Nile is), or a way-station (some sort of ritual building used during ceremonies that travel from place to place), or something else mysterious – a treasury, perhaps. Would you go in there? |
|
|
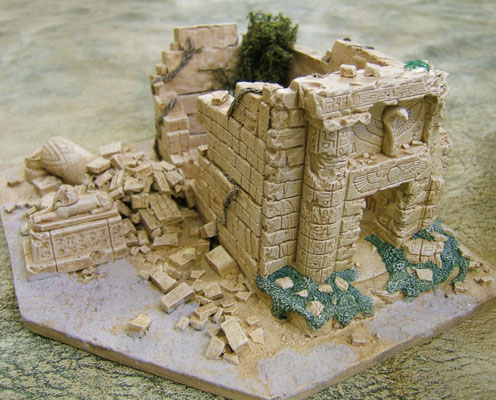
Sitting on my shelf for years were some resin castings by Grendel. One was sold the “Temple of Horus” but was really just a nice sitting statue of the god, and a bit of wall. I decided to put this to use, by making it part of a ruined temple building. An L-shape seemed more tactically interesting than a rectangle. The base board is hardboard again, and all the non-resin bits are plaster castings by me, based mostly on Hirst Arts moulds.
I haven’t represented every last bit of displaced masonry. I have for convenience imagined that other bits of stone have been looted by local builders. What fallen masonry I have included is placed in tactically useful places, with wargames in mind, although I regret gluing down that little block behind the square plinth and bottom centre of the picture. It makes it hard to stand a figure behind the plinth. Learn from my mistakes. You may notice that there are two distinct textures and colours on the base outside the building. This is because I had a nightmare trying to get a matt finish. I had used a mastic gun to do a lot of gap filling and gluing. For instance, I glued the back-to-back sections of stonework together this way. It makes a durable bond, and the gaps get filled all in one process. However, I made the mistake of using mastic to help texture the ground. Do not do this. It may seem quick and easy, but you may find as I did that getting varnish to dry matt on this surface is next to impossible. I tried five coats of increasingly rare and expensive varnish. Sometimes the whole coat was glossy. Sometimes a coat might dry mostly matt, with just glossy spots, but the same varnish used the next day, and stirred every bit as much would dry bizarrely and infuriatingly glossy. I have never had much luck with matt varnish, and have never found one that dries consistently matt. Eventually, I gave in and covered over my sharply-detailed dry-brushed and shaded base with a very matt mix of plaster and poster paint. The effect is matt but bland.
This building is completely made up, and is based on the front façade, which is a Grendel casting. The base is skip-rescued board, the side walls are hardboard covered with castings of stones (half thickness where the pillars are, full thickness above and below). The removable roof is just a slab of card, textured with mastic (not varnished!). I put in a skylight not just for illumination, but also it makes it much easier to get the roof off. The paint job again suggests a spruced-up but past-its-prime building. By a wonderful coincidence, the stones on the façade match those of the side walls exactly (they are both one inch by half an inch). In style this building feels more like one from the later period when the Macedonians and Romans were building in the Egyptian style. I had another Grendel entranceway. I decided that as an entranceway alone it would never get used. What was its purpose? An entranceway in a wargame can only be used right at the edge of a table, where it will inevitably get knocked off. Detailed models like this for role-play gaming are going too far. It became the front wall of an overgrown ruin. The stones in the resin casting were half the size of the Hirst Arts stones, so I had to score into the plaster castings a lot more stone edges, using a ruler and a tungsten spike (see tools). |
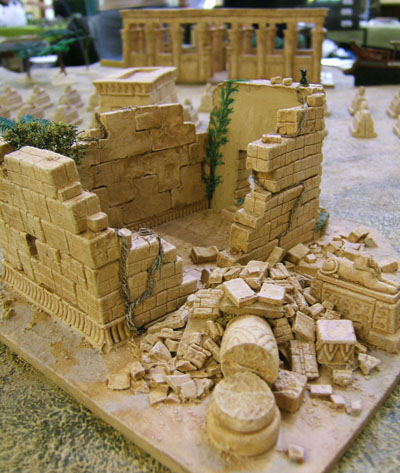
| A ruin is an opportunity to use a load of broken and miscast pieces, and these I glued about the place in abundance, particularly in the pile of rubble next to the main breach in the wall. The central volume of the pile is made up of off-cuts of the base board, and this is coated in plaster rubble. |
|
|
Again, the inside of the building is paved with flagstone texture. The particular texture I used I bought for making Trojan War period flagged surfaces, because I noticed that it matched the pattern of flagstones used at the palaces of Minoan Crete. I have no idea if it is authentic for ancient Egypt. Small black cat by Irregular Miniatures. Did you know I didn’t even have any Egyptian figures? |
|
I was very happy with the colour of the flock on the big horsehair bush growing in the corner of the ruin. I mixed some normal temperate-green leaf flock with quite a lot of "wheat" flock (shades of brown). For details of how I did the climbing plants see here. If you want to see more of my Egyptian buildings, including sphinxes, obelisks, and a Nubian tomb, see this description of a skirmish game scenario. BACK TO BUILDINGS MENU BACK TO SCENERY MENU BACK TO MODELLING MENU Click here to go back to the home page |