Trenches are a problem for the wargamer. Tables are flat, and trenches are holes. The portable hole, though one was featured in the film Yellow Submarine, is beyond current technology, and all solutions to the trench problem are imperfect. Some people build a little mound, and then sink the trench into it. I have a Bellona vacuum-formed trench made this way, and I don't like it much because it looks like a hill with a trench in it. Other people build up the entire table with enormous pieces of terrain, and sink trenches into that. This means that you get rather limited terrain, which has to be the same or similar every game, and you need a large vehicle to transport the terrain, and a large room to store it in.
Another approach to the trench problem is to model not the full depth of the trench, but just the top of the trench, and then make cut-down figures to go in the trenches. You buy figures and cut just head and shoulders/arms off them, and use these to represent troops in the trenches. This is nice enough if you can be bothered, but it means that you have to make two versions of all your troops, and life is too short for that.
All solutions to the problem are compromises. Here is mine.
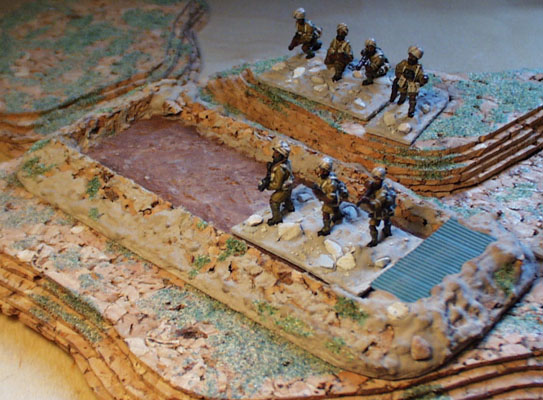
Here you see one stand of Sikhs about to enter a trench, and another already there. The trench piece is reasonably small and durable and easy to transport and store. It does not look like a hill, because it isn't tall enough for that. It appears deeper than it is, because the bottom of it is painted a darker colour, and because imagination helps the illusion along a bit. The raised sides of the trench come up about to knee height on the figures.
The trench section is a piece of thick card, with pieces of cork glued on it to bring the sides up a bit. The outside of the trench has a gentle slope, and the inside a steep one. The same mud mix that I use to base my figures binds everything together and fills the gaps (you could use brown acrylic mastic to do the same job). At one end of the trench, some corrugated iron sheeting (Wills plastic sheeting - actually transparent before painting) acts as a roof from the elements. You could use planking, corrugated iron, or similar to line the inside of the trench. Troops who had the time would often shore up their trenches this way. Sometimes wattle fencing was used.
This trench is a simple shape: a rectangle. Trenches were also U-shaped and L-shaped quite commonly. Larger trenches would always have angles in them, so that shrapnel from a shell landing in the trench would not blast down the full length of it, but would soon meet a corner.
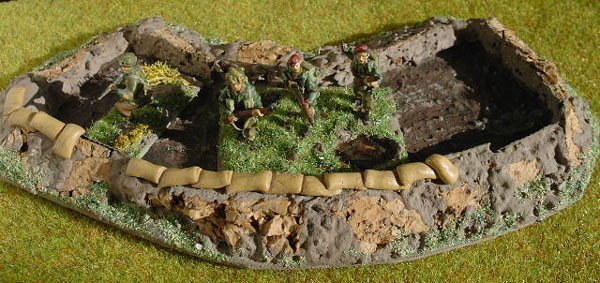
Here we see some British paras (Esci and SHQ) in a trench. The front edge of it has been fortified with sand bags. These are made from Milliput putty. I rolled the putty into a sausage shape, then cut it into lengths with scissors. The cutting action pinched the putty into bag-like ends, and these pieces were simply pressed onto the model and then painted when dry.

Here we see corrugated iron sheeting used to revet the front edge of some trenches. It is made from Wills sheeting. Some of it I have painted green, and some of it blue, to suggest that it has been scavanged from a civilian building. The formation of the trench has little communication trenches linking fighting areas.
BACK TO SCENERY MENU BACK TO MODELLING MENU
Click here to go back to the home page
