Making Hoplite Armour

Like the section of mail armour, this section provides advice on making armour, along with some general discussion of the armour type.

A hoplite was a soldier defined by his use of a type of shield called a  hoplon, which was a very odd shield indeed. More of that later. For the moment, some pictures...

Lloyd wearing hoplite panoply

Lloyd, wearing hoplite panoply. The picture shows the cuirass, covering the torso, with its brass scales, and its blue and white pteriges; the inside of the hoplon, complete with authentic fittings; the suspension of the sword; iron greaves. Strictly speaking, the legs should be bare at the thigh, but even Greeks wore more clothes when it was parky.
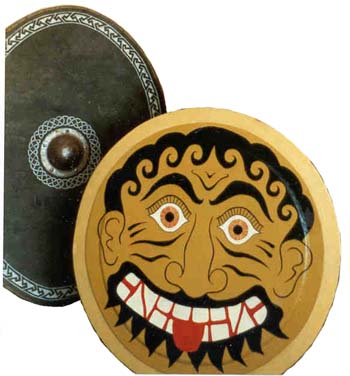
Shields

Two shields. At the front we see the face of the hoplon, with authentic design, and behind we see a Romano-British shield.

Lloyd wearing hoplite panoply at festival

Lloyd wearing the outfit at Hopwain, an event he organised for a live-action rôle play festival. He is playing the character of Earl Berwick, and beside him are bodyguards with the confusing names Castel and Stennel, which Lloyd seldom got the right way round.

A hoplite panoply is clearly a wonderful thing, I must make one!

Well, then possibly I can help you there. The panoply included a spear and a helmet, which I have not illustrated. My helmet is not brilliantly authentic, and my spear is very plain. The proper way to make a helmet involves hammering a thick piece of metal over over a former, using a chisel-headed hammer, and a great deal of skill. I can offer help with the greaves and the cuirass, and my writings on the shield and the spear should shed some light on how to go about things.

Hoplite armour - cuirass ▼

Hoplite Armour: Cuirass

They were made out of linen, weren't they?

Er, well, possibly, but I think not. There is a long-standing idea that the ancient Greeks made their stiff body armour from linen, when they did not use bronze. The idea is that they got many layers of this cloth (usually about fifteen or so), and glued them together to make a stiff garment which would be of some use against blows. The actual evidence for this, though, is very far from convincing. The literary evidence is a single reference to "linen corsleted Argives" which can be interpreted a hundred ways, and certainly does not mean that all classical Greeks made armour from many layers of linen. It could be that the Argives were unusual in that they used linen. It could mean that the Argives had some garment which wasn't armour which was linen, or that they faced their armour with linen. The physical evidence is also very poor. There is a tiny scrap of some object, which would fit in a matchbox, consisting of many layers of linen. This was found in Mycenae, dating from a period nearly a millennium before classical Greek hoplites. That's not good enough for me.

Another snag with the linen-theory is that linen is very difficult, time-consuming and expensive to produce. You need to plant many acres of the plant, which is little use as food, and the processing takes many people and a lot of space. To make thousands of cuirasses this way, a small city-state would have to plan ahead a long way, and devote a lot of resources to the manufacture of linen, which was prized as a cloth for rich people to wear as everyday clothing.

It strikes me as far more likely that the Greeks used leather. They had cattle already, and used these for traction, meat, milk, and religious sacrifice, and so they would not have to devote any more land to leather production. Leather can be very thick, very tough, and very stiff. It would be so much cheaper and easier and quicker to make a cuirass from leather, that I think that I am justified in having made mine from this material.

I suppose that I should mention the only surviving cuirass of this type. It is from the so-called tomb of Philip II of Macedon (Alex's dad), at Vergina. The style and shape of this is the same as that pictured on vases and in temple sculptures, but the material is iron, with gold decoration. It seems fairly clear that this is a copy in metal of something which would normally be made in another material. I don't think that it sheds any light on this linen-or-leather debate (see Greece and Rome at War by Peter Connolly, p.58).

The leather I used was shoe-sole leather, about 3/8" thick (1 cm), which is tough stuff. When rude people come up to me while I'm wearing it, and knock on me as though I were a door, they hear a solid knock sound, as though I were a door. I usually reply by cheerfully punching them in the face. Even with the stoutest cutting tools, this stuff is tricky to cut, but it can be made much easier by soaking the leather in water first. Remember to mark the pattern on the leather while it is dry, because the leather will swell a bit when wet.

I started making the pattern by studying the one illustrated by Peter Connolly in his book. I corresponded with Peter, and he was helpful to a point, but I strayed in the end from his pattern in a number of ways. One major difference is that he has the top layer of pteriges (literally "feathers" - the strips at the bottom making a sort of skirt) as one with the main body of the cuirass, whereas I have the pteriges as separate. Since I was wanting to wear the cuirass myself, I had to make a pattern which would fit me. To this end, I drew one on thick two-ply corrugated cardboard, and tried it out. I made the whole pattern too big on purpose, and trimmed it down by stages until I was happy with the fit. To start with, there are just two pieces: the yoke which goes over the shoulders, and the body, which wraps around the torso. On my cardboard mock-up, I attached the two together with twists of plastic-wrapped wire, threaded through holes in the cardboard.

Cuirass laid out flat

Here we see the cuirass laid out flat. Possibly, the ancient Greeks stored them this way. Possibly, when unworn, they were hung on walls.

On the left, you can see the two red-thonging ties, which tie at the left side of the torso of the wearer. I would have thought that a third central tie would have made the join a bit more secure, and on mine the join does tend to gape a little in the middle, but I have found no representation which shows a third tie on the side of a hoplite cuirass.

You can see the five rows of scales. These are one inch by two inches, with the bottom edges rounded off with tin-snips. Holes for sewing were drilled through the top square ends, with the help of a modern pillar drill and a simple jig. The top ends of the top row are hidden by a length of leather which overlaps them and is sewn along its top edge to the main body of the cuirass. I was planning eight rows of scales, and made enough scales for this, but I found that it was taking me seven minutes to attach one scale, and so I decided that five rows would be enough. There are examples of such narrow bands of scales pictured on ancient Greek pots.

On the bottom right of the photograph, you can see the end pterige of the lower row sticking out. The two rows of pteriges are staggered, so that the lower one covers the gaps of the upper. I tried making the pteriges longer on my original pattern, but then learned the hard way why they are so short on classical Greek examples. Any longer than this, and you can't sit down without the ends of the pteriges at the back's hitting the chair and bending uncomfortably. You will notice, as I have, that on all ancient sculptures and paintings which show long pteriges (later Roman, not classical Greek), which come down to protect the thighs, these are always shown as soft and flowing, rather than stiff, as classical Greek ones are. Presumably, with thinner, softer leather, this sitting problem is not encountered.

In the middle of the chest front (on the right, above), is the thing to which the two ties of the yoke are tied. Around it you can see some reddish smudges, where the red dye on the ties has made marks.

At the top of the picture is the yoke, which goes over the shoulders. If you look at ancient depictions of the pieces which come over the shoulder, they are not as wide as you might expect. If they are wide, they make you look terribly hunky and broad-shouldered. However, they also stop you from raising your arm. Try raising one arm now, directly upwards, go on, the whole arm straight upwards. Your biceps will be somewhere near your ear. Now, with the other hand, feel the width of the space where the shoulder piece would go, between your neck and your shoulder. You will notice, unless you are somewhat anatomically eccentric, that this space is very narrow indeed. Even with quite moderate shoulder "straps" (for want of a better term), you will not be able to raise your arm straight upwards while wearing a hoplite cuirass, bringing the upper arm to the horizontal is easy enough.

Between the shoulder straps, is a rectangular section which sticks up at the back of the neck. This protects the back of the neck from sun and blows, and has the extra benefit of holding the strap by which the sword and scabbard are suspended, away from the neck, stopping it from cutting in uncomfortably quite so much. I say "quite so much" because it still cuts in a bit, at the front.

Inside view of cuirass laid out flat

The cuirass, inside view. Here we see the rough side of the leather, which is of course veg.-tan leather, as it should be.

Notice that the yoke is bending forward. I store my cuirass in the as-worn position, and over the years the yoke has taken on this shape.

You can see the line of linen thread stitching, which holds the yoke to the main body. To sew anything to leather which is this thick and tough, you will need a very sturdy awl. I made mine by grinding down a metal-working punch, and setting it in a handle. Make sure that you come up with some method for neatly spacing the holes you punch.

The single line of stitching, holding the upper of the two bands of leather which border the scales, is visible, as are the two rows holding the lower band. The bands of leather are about the thickness you would use for a good leather belt. I used "saddle stitch" and "saddlers' needles" and thick white linen thread. I threaded each end of a length of linen thread with a needle, then passed one needle through the leather and pulled until the length of linen was half on one side of the cuirass, and half on the other. I then sewed along the cuirass, from both sides, and the result is very strong stitching indeed.

The scales were sewn on with modern man-made fibre thread. Yes, this is a cheat, but I feared that the linen thread might break more often, and unlike an ancient Greek hoplite, I have no servants to repair my armour for me. As it has turned out, none of the stitching on the cuirass has ever failed, despite rough usage. Some scales have bent, but I have been able to bend them back into place without breaking any of the stitching. You can see the five rows of brown thread stitching, which hold on the scales.

cross-section diagram showing attachment of pteriges

The red lines show the lines of stitching, used to attach the pteriges. The lower band, at the bottom of the scales, has two lines of stitching going through it, securing the upper row of pteriges, and a wide band of softish leather on the inside of the cuirass, to which are sewn the lower pteriges. In the photograph of the inside of the cuirass, the wide softish strip of leather is bent on the right, to show us the inside of the lower pteriges.

cross-section diagram of brass tie fitting

This shows in section the brass fittings to which the red thonging ties are tied. A disc of metal is cut out, a hole is cut in its centre, and then the pierced disc is hammered into a dish shape. A small square of metal with a hole in it is cut out. A length of brass rod is cut, and one end of this hammered in a vice until it is mushroom-shaped. This rod is then threaded through the small square, through the leather of the cuirass, and through the dish, and the other end is hammered into a mushroom, to secure the lot. Some ancient examples of the dished part look quite fancy. Part of the trick is to get the distance between the rim of the dish and the outside of the cuirass, to be the same as the thickness of the thonging ties. That way, when you pull everything tight, the thonging holds the dish edges parallel with the outside of the cuirass. If you make the distance too small, the thonging will be difficult to tie under the dish, and if you get it too great, then the rod will be pulled out of the perpendicular.

The ties on the yoke are attached to brass D-rings, which are threaded through soft leather straps, which are sewn to the end of the shoulder straps.

That's near enough everything I have to tell you. I scored decorative lines around the edges of the leather parts, and painted between these lines and the edges blue, after painting the rest of the cuirass white. I used modern acrylic paints, which is another cheat. I was advised to do so by people who assured me that using the ancient hot-wax technique is very difficult. I do fear, however, that the people advising me thus (from the University's art department), were the sort who would never consider making real armour at all, and would be content with knitted string for mail. Perhaps it isn't that tricky at all. Certainly the ancients did not want for a variety of pigments. Do not use oil paints. Not only were these invented in the Renaissance period, but also they don't work very well on leather. I know, I tried.

So is it comfy, then?

I have worn the panoply for as much as three days on the trot, and have done a fair amount of vigorous exercise in it. I can report that I did not over-heat, and nothing has broken or fallen off. One does have to sit and stand pretty upright, but I see this as no bad thing. The only adverse affect I can report is nipple-rub. As I twist my torso, as I might as part of a running action, the stiff body of the cuirass does not twist with me, and the relative movement did chafe a bit after a while. Perhaps ancient Greek warriors had calloused nipples.

My cuirass weighs 14 pounds (about 6 kg) according to a spring balance I bought from a shop called Everything's a Pound. How typical this is of a cuirass of this sort, I could not tell you.

Happy armouring, everyone.

Hide ▲
Hoplite armour - greaves ▼

Hoplite Panoply: Greaves

I don’t have a huge amount to write about greaves. Greaves that have been found have been bronze, but bronze survives a lot better than iron, and the Greeks did have some iron armour. Paintings and sculpture do not tell the viewer whether a greave is iron or bronze. I made my greaves from iron. Another good reason for this is that iron sheet is cheap and easy to get compared with bronze.

I met a very professional armourer who made a hoplite panoply, and he used bronze. Like me, he hammered the greaves from a sheet.

I made my greaves by making a rough pattern with cardboard, to fit my own leg. I then made a slightly over-size copy in thin aluminium sheeting. It was like very thick baking foil, and could be bent easily with the fingers, and cut with a stout pair of scissors. I bent and trimmed and bent and trimmed until I was satisfied, then rolled the foil out flat, traced the pattern out, and cut my greaves out from iron sheeting.


I worked out where the kneecap would be, and hammered a nice dome there, and bent the whole greave round into a near-tube. As much as I could, I hammered the things into shape against leather-covered sandbags in a metal-workshop. The surface was “dressed” by hammering very gently on “dollies” which are little shaped mini-anvils which one clamps in a vice. This gave the domes for the kneecaps a nice finish.

There came a point, however, when the curvature of the greaves made it impossible to shape them in this way. I then showed the world how much I wanted those greaves. I put them on my legs, and hammered them into final shape there. Yes, it hurt, but I’m British and can take it.

The final result was a pair of one-piece greaves which fitted quite nicely. They hold themselves on my legs by virtue of their shape and the springiness of the metal. Though I have worn them in all manner of circumstances, and have run, climbed and even danced in them, they have never fallen off. When on, they feel light, and hardly slow my running speed at all. After I had had them for about four years, I decided to make them a bit more comfortable, by drilling lots of little holes around the top and bottom edges, and sewing on some sheepskin, with the trimmed fur on the inside, as padding. Before I did this, the bottom edge would dig into the top of my foot a bit, and the top edge would scrape at my shield. Real ancient Greek greaves have little holes around the edges, so I think that what I did was quite authentic.

Very soon after being made, the greaves went very rusty indeed. I scraped off the rust with wire wool, and coated the greaves with vegetable cooking oil. This oil set, leaving a dry finish, and has protected the greaves very well ever since. I do sometimes get a bit of rust forming on the inside, where moisture condenses from my sweat.

Hide ▲
Hoplite shield - hoplon ▼

Hoplite Panoply: Shield

A hoplite was defined by his shield, the hoplon. Soldiers with this sort of shield were hoplites. Those without were not.

The introduction of the hoplon coincides with the adoption of the hoplite phalanx formation, and citizen warfare. Before that, warfare in Greece was between warlords and warrior élites, who tended to ride around on horses and chariots, exchanging insults and chucking javelins about the place, and occasionally coming to blows. In the days of the hoplite, armies were made up of large numbers of citizens of the emerging Greek city states.

To qualify for full citizenship, a man had to outfit himself with hoplite panoply, and be available for war. This was quite a commitment, and meant that armies became larger, well-equipped, and composed of reasonably wealthy middle-class men. These men were not full-time soldiers, and had to have faith in their fellows. A large formation of troops which wavered in the face of an attack, would lose against another which held firm. To hold firm, each man must be confident that the man next to him will do his job. This is easy enough for a well-drilled professional killer, but for the manager of a pottery, flanked on one side by a baker, and the other by a poet, does not come so naturally.

It is my belief that the hoplon was designed with the citizen in mind. I write this because it seems to me that its design is specific to the problem outlined above. The main reason why a large formation of spearmen will lose against another is that that it breaks up. It would be worthwhile getting every man to use equipment which would increase group cohesion, even if each man in the group had slightly less efficient kit.

A hoplon is a fairly good shield when used in line with many other men also using hoplons, but it is close to useless in individual combat. Consequently, every man in a formation of hoplites would know that he would stand little chance against his foes were he to break ranks. Better to stick together.

The hoplon is a very unusual shield indeed. The vast majority of shields in the ancient world were centre-grip, that is, were held by a single handle in the centre. Very few shields indeed were cross-grip, that is, held by a handle for the left hand, and a strap which went over the left forearm near the elbow. The hoplon was particularly odd in that the handle for the left hand was not in the centre of the shield, nor were the two points of suspension either side of the centre, but instead, the handle was at the rim of the shield, and the strap for the forearm was in the centre.

This arrangement has several effects. Half of the shield stuck out to the user’s left. This was not of great use to him, but did serve to cover his neighbour. This would encourage team fighting and discourage defection from the team. The right-hand edge of the shield would not interfere with an under-arm use of a spear so much as it would with a centre-grip shield. This is useful for a formation of spearmen. The shield is very bad at parrying. Whereas a centre-grip shield can be held at arms-length away from the body and moved independently of the body, a cross-grip shield can only be held close to the body. If the user wanted to parry a low blow, he would have to stoop forwards and move his arm a long way down. By doing this, he would expose his back, and it would be tricky for him to bring his hoplon back up quickly. All hoplites wore greaves to protect their lower legs. These would be quite adequate against spear-thrusts, but would be a lot less use against sword cuts. Their feet appear to have been fairly exposed, in leather sandals. I’m not sure what to make of that.

In one-against one combat, a hoplon is a terrible liability. A foe using a centre-grip shield has an enormous advantage. A centre-grip shield can be punched out in front of the user, one effect of this being to block the enemy’s view of the user. The volume of space defended by a centre-grip shield is far greater than cross-grip. The half of the hoplon which sticks out to the left is of little defensive value in duelling, and is an awkward load.

When fighting in re-enactment battles, I had to learn the hard way that a fighter should hold a shield, when he is duelling, away from the body. In time, I became pretty competent in using a centre-grip shield, and I could defeat people who hadn’t got the hang of it pretty much every time. When I joined a different society which had made cross-grip shields, I found that with my centre-grip shield, I could be confident of defeating anyone if I could face them alone. A cross-grip shield forces the user to hold the shield close to him, and limits the movement of the shield very greatly. Later, I made myself a hoplon, and used it in a fair few fights. When in line, I found that it wasn’t as good as a centre-grip shield, because of its more limited movement, and awkward off-centre position, but it was still pretty useful. In one-on one combat I found that the only way I stood any chance at all was to pull my arm back through the elbow strap and hold the shield by that central strap. In effect, I turned the shield into something like a centre-grip shield, albeit one with a very awkward handle and balance. I can’t remember winning any fights that way, but a few times I was able to keep myself alive long enough for someone to come to my aid.

As this diagram shows, the angle of attack is greatly different depending on where the shield is held. In the upper part, the blue man holds his shield centre-grip, and the red man can thrust a spear (green lines) either above the blue man’s head or at his front foot. In the lower part, the blue man is exposed to spear thrusts at his head and lower leg, because he holds his shield centre grip. Worse than this, though, is that whereas the upper blue man need only thrust his shield a bit further forward (perhaps using footwork), or lower it slightly, to parry spear thrusts at his foot, the lower blue man would have to bend forwards and reach with his shield arm downwards to fend off a low attack, thus exposing his head and upper body and back to attack.

Because the hoplon is so demonstrably dreadful for duelling, it is my contention that it was designed specifically to be bad at duelling, and useful in phalanx formation. That large numbers of people were persuaded for the good of their city states, to equip themselves with such selfless equipment, is remarkable. No hoplite would want to break ranks, for to break ranks would mean that their useful equipment would become next to useless. Thus did the citizen ranks stand firm. Given that an entire social class was persuaded to engage in large infantry battles for the sake of the state, it seems only a small step further to persuade them to use hoplons.

The hoplon itself was a round shield, nearly three feet in diameter, and weighed around 15 pounds. Its rim was bronze, and sometimes it was faced with a thin sheet of bronze. Sometimes there was a sheet of bronze on the inside of the shield, L-shaped, to protect the left arm. The entire shield was curved like the glass on the front of a wristwatch. This meant that the left elbow was roughly in the centre of gravity of the shield. This is very important, because it means that the shield would hang vertically. If the hoplon were flat, and every bit as heavy, then it would hang with the top edge tipped forwards and away from the user. The curvature would also act to strengthen the structure. A further benefit of this curvature, which becomes apparent when one makes a reconstruction, is that it is possible to hook the shield onto the left shoulder, and so hang it on there, allowing the left arm to rest. Cross-grip shields are a lot more tiring on the shield arm, because you hold them with a bent arm. This feature alleviates that disadvantage.

It has been suggested that the reason a hoplon was round was because it was convex. This strikes me as quite reasonable. Other shields used by other cultures varied quite a bit in shape, but all hoplons were round. The convex design keeps the hoplon uniformly circular.

If battles did come to the shield-against-shield push, which some historians believe was the case, then the curvature and handle arrangement would combine to help the user push strongly against the foe.

The strap at the elbow is very broad, and often quite fancy. The handle gripped by the hand is sometimes a rope-like thing, as on my reconstruction, and sometimes a cut-out hole in the bronze rim of the shield, which I imagine would be a bit stronger.

Around the inside of a hoplon, are eight bronze fittings for attaching a rope. In the embarrassing photograph here, you can just about make a few of these out, each one having a yellow tassel hanging from it. I haven’t really sorted out what these were for. The fittings on my reconstruction are the correct distance apart, and the rope passing through them all in a hoop is of the correct length, judging from the slackness shown in pictures and sculptures. The strap does not make it easy or comfortable to sling the shield. The arrangement is so complicated, that I imagine that there were several configurations possible. Perhaps the rope could allow one to sling the hoplon on one shoulder, or across both, or to prop the hoplon up against a spear stuck in the ground. Since my hoplon is not of the correct degree of convex curvature, perhaps I am missing something.


I’m afraid that I cannot give detailed instructions on how to make an authentic hoplon. Mine does not have a bronze rim – merely wood painted bronze coloured. Although my hoplon is convex, it is not as convex as a real hoplon would have been. I made mine with a few layers of plywood cut in discs and hoops of different sizes, glued and riveted together, with rounded-off edges. The fittings are fairly authentic, as is the design the front, except that I used modern paints.

Hide ▲
Hoplite spear ▼

Hoplite Panoply: Spear

I have written a long article about the spear in my weaponry section. Refer to that for most of the detail on this weapon.

A hoplite was first and foremost a spearman. It is perhaps significant that there is no word in Greek for swordsman.

A hoplite’s spear was in the region of eight feet long, and had a head made in the early days of bronze, but for most of the classical period of iron. Since iron rusts, few survive. The shaft of the spear was round in cross section and typically made of ash wood, which is rare in Greece.

Coinciding with the introduction of the hoplite panoply, was the use of butt-spikes. These were typically square in cross-section, and between 2 and 8 inches long (one example was 15 inches – which makes me doubt that it was a butt-spike at all). They would prevent damp getting into the end of the spear so easily, which might cause it to rot. They would have acted a bit as counter-weights, but I doubt that this was an important function. They were used for stabbing downwards at the fallen. Often in art the butt-spike, or sauroter as it was called in Greek (literally “lizard killer”) is shown as the means of finishing off an opponent, the coup de grace if you like, this blow being delivered double-handed. Perhaps they could have been used for non-lethal slapping blows. They were also a back up to the main spearhead, and perhaps might allow a man to thrust backwards as well as forwards when surrounded.

One way to make the shaft is to get a length of ash, which comes from timber yards square in cross-section, and somehow round it off. There are machines which can do this efficiently, or you could do it with hand tools. The Greeks probably went to some trouble to get the spear-shafts nice and smooth, so the machine might give a more authentic result.

My spear-head is not forged, but was made in a rather easy cheats’ way. I bought the head of a tool designed for cutting the edges of lawns neatly. It is a socket, and a semi-circular blade. Simply cut the blade down to a spearhead shape. I removed the paint from the tool by placing the whole thing in a fire. Most modern examples of this tool are made from a flat sheet, and do not give the most authentic result. The old-fashioned sort was forged, and is stronger, more symmetrical, gives you a much more authentic spearhead, and is much more difficult to find.

Hide ▲

Back to top