MODELLING TIPS: WW2 Vehicles

I am a wargamer, not really a model-maker, but sometimes I do get a bit carried away.

Modelling Churchill tanks Modelling Hanomag 251 half-tracks Fun with Shermans WWII British paratroop jeeps LCM landing craft Converting Airfix Panzer IV F to D Converting Airfix Panzer IV F to H Painting weathering effects on vehicles

Hanomag 251 Half-tracks and Variants

The vehicles of the finished 251 company

When I was slightly younger and comparatively ignorant, I thought that it would be a good idea to make up a load of 251 Hanomag half-tracks, so that I could wargame with them. My simple idea was to have enough to field an entire infantry company. This seemed easy enough. Each Hanomag half-track could carry a section, so three could carry a platoon of three sections, and so nine could carry a company of three platoons. I bought up a load of the Matchbox 1/76th scale kits and started modelling. I might have been a happy person, content with my little project, had I not suffered from the ghastly flaw of feeling that a bit of research might be good.

I soon discovered that each platoon had a command vehicle, which was different, as it had a 37mm anti-tank gun on it instead of the front machine gun. No matter, thought I, and I converted one Matchbox kit, and got hold of two Fujimi kits of the same scale, which had the 37mm AT gun as an optional few parts. If only I could have let things lie. More research revealed so much more.

It turned out that each armoured infantry company had a support platoon. "Blast," thought I, "another four vehicles." If only. The support platoon varied enormously in composition, but typically had two 251/9 Stummels with 75mm guns, two 251/2 mortar carriers, anti-aircraft variants, and extra 251/1 passenger vehicles for such things as sustained-fire machine gun and panzerschreck teams. Even more, the company as a whole had a command platoon, with radio vehicles, and more AA vehicles. I kept going back to my local model shop for "Just a couple more Hanomags, to finish off my company."

Worse still, the Matchbox and Fujimi kits are of the Mark B version of the vehicle. The Mark A versions were the best looking, with extra view ports down the side, but these ceased production right at the start of the war. The Bs were good-looking. The C versions were slightly uglier, but many of the later variants, such as the 251/9 Stummel, used this version of the basic vehicle. Later still, was the Mark D which was very ugly and very different-looking. To make such specialist converted vehicles, I would need first to convert the Matchbox kits into Mark Cs or Ds and then convert these into the various variants.

Be warned, therefore, of the dangers of research.

The vehicles of the finished 251 company

Alle zusammen. The back row is the heavy weapons support platoon, left to right: three AA vehicles (251/17 with unarmoured open back, then 251/17, then 251/21); the platoon's 251/1 command vehicle; a Kettenkrad half-track motorcycle (by Hasegawa) for the platoon's messenger rider; two 251/9 stump guns; two 251/2 mortar carriers.

The middle of the picture has the panzergrenadier infantry vehicles of the three platoons, each with three 251/1s, and one 251/10. Each platoon is painted with a different camouflage scheme, which makes things clearer for wargaming purposes. The left hand platoon is in "ambush" scheme, and the centre one is in panzer grey (making it suitable for games set in 1940).

The front row is the command platoon. Left to right: a motorcycle with side-car (would normally be a simple motorcycle, but they used whatever they had); a VW 166 Schwimmwagen (might just be an ordinary Kuebelwagen, but who wants to be ordinary?); a VW 82 Kuebelwagen (officer's personal transport, not for front line battle use); the two 251/3 command radio vehicles; one 251/17 AA vehicle; a Kettenkrad, and a motorcycle with rider (both SHQ). The motorcycle, unlike the rest of the vehicles, is mounted on a base to help it stand up, which alas also makes it a bit difficult to see.

For some reason, I have photographed the 251/21 with the support platoon, and one of the two 251/17s with the command platoon. The vehicles might well have been assigned this way, but the 251/17 models are all in the camouflage scheme of the support platoon, and the 251/21 is in the same camouflage scheme as the late-model 251/3 radio vehicle, so really should have been shown at the front. No matter.

Now pick and click:

251/2 Mortar carrier variant ▼

Hanomag 251 Half-tracks: Mortar carrier variant

Both these vehicles are based on the B version of the vehicle, which saves a lot of work. My excuse for this is that mortar carriers probably sustained fewer losses than front line half-tracks, since they lurked at the back of battles.

Hanomag 251/2 variants

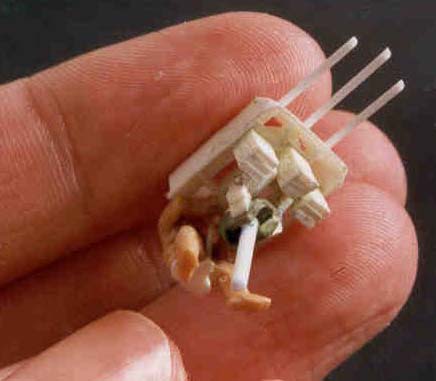
Here you see the two mortar carrier vehicles I have made, before painting. After painting, the alterations to the basic kit won't show up so well. In the foreground is the base of the crew cartridge, with scratch-built 81mmm mortar. On to this will be glued a couple of crewmen. If the mortar dismounts, or the vehicle gets blown up, the cartridge will be removed. In the vehicle on the left, the cartridge is in place, with an SHQ white metal mortar. The mortar base plate on the vehicle floor is a half-cylinder shape. The front legs of the mortar rested on the sloping sides of the vehicle, so the cartridge had to reflect this. The square notch in the front of the cartridge fits around the central raised portion of the floor, between the front seats. The scratch-built mortar is made from plastic rod, sprue, plastic card, and old paint tube (metal foil), based on the SHQ model, with a few extra details from plans.

Note the radio aerials on the front right of the vehicles, for receiving word from the forward observers. These were very fiddly things to make, as the bottom bit is a complicated shape, and I used many tiny pieces of plastic. The aerials themselves are artificial pine needles from a Christmas tree, which were super-glued into holes burned with a hot pin in the ends of the stalks.

The vehicle on the right has lost the mudguards over the front wheels. This was very common. Sometimes they were removed deliberately. The headlamps have been added above the right front visor and below the left side visor, and have slits burned and trimmed into them with a hot pin and a scalpel. The front wheels have been cut off the axle, trimmed at a slant, and glued to appear turned to one side. The kit had a recess in each side of the nose of the vehicle, into which fitted the front parts of the mudguards. These recesses have been filled with Milliput putty.

Looking inside the left vehicle, you might notice that there is no steering wheel. That will be added after I have painted the inside floor of the model, and then glued it in place. If you glue the steering wheel in at this stage, you can't get the floor in and out.

Hanomag 251/2 variants, top view

A top view of the same two half-tracks, both with cartridges in place. Note that the mortars fire forwards, and that the muzzles are just above the level of the sides of the vehicles.

The base plate for the mortar when it dismounts was not stored always in the same place, and some depictions show it on the outside of the vehicle, which is where I have put mine. I wanted it there because it looks nice. On the top vehicle, it is on the left rear, and on the bottom one, you can just see its top edge on the right rear door.

Neither vehicle has a front MG. On one, I have placed a rifle in its place. These vehicles were equipped with rear AA MGs, but these have been left off until the final stages of painting.

From this angle, you can see the fit of the cartridge quite well, with the angled pieces of the base resting on the side walls just behind the front seats.

The rear right benches have been removed, and replaced with a low shelf on which rest ammunition boxes, made from a sandwich of plastic card, with a design scored on the flat sides with stylus. By pressing the parts of the sandwich together while the plastic is still half-dissolved by glue, the effect of raised lines of detail on the edges is achieved. I have glued the boxes in a staggered formation, because after going to all that trouble, I want it to show that they are all separately made. I glued one on the seat, overhanging. You can see that I have had to cut a little triangular piece out of the cartridge base so that I can get it in and out easily. You may wish to avoid this folly.

The personal stowage on the left side of the bottom vehicle is made from sprue and plastic card, or else is cut off from unwanted figures. Get an infantryman, cut off his boots, helmet, pack, entrenching tool, gas mask canister etc., and glue them onto a vehicle, for some detailed clutter. Make sure to carve the boots flattish, and add a suggestion of a hole at their top. You'll want super-glue and/or universal adhesive to glue on polythene pieces to the polystyrene kits.

Hanomag 251/2, finished models

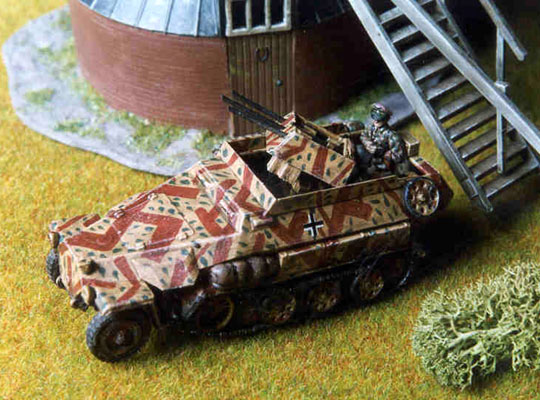
Here we see the finished models on the wargaming table. The one on the left has no front mudguards, and I have splattered extra mud on its nose accordingly. You might just be able to make out the black oily hand print painted on the left side of the nose. You can see more black oil painted oozing from the little hatch on the nose of the right-hand half-track. You can see a jerry-can painted black with a white cross. This was the standard marking for a jerry-can which contained water. Both British and Germans used this marking. The camouflage pattern, sand ("dunkelgelb" - literally "dark yellow") with brown crosses, is an authentic one. Barrels by Hovels, AT emplacement by Faust, crewmen by SHQ and Esci.

251/3 and /6 radio/command variant ▼

Hanomag 251 Half-tracks: Radio variants

Hanomag 251/3 empty

View of a radio vehicle. It has in it a table, and so will do for either the 251/3 radio variant, or the 251/6 command variant. On the table is a hinged box. When opened (it was much easier to model it closed), this looks like a typewriter. In a 251/6, this would be an enigma machine for decoding signals. Because I have too much time on my hands, I added a pair of gloves and an ashtray to the table. These will show up better when I've painted them.

The vehicle is a late radio variant, with the "crow's foot" aerial, and these were on the C version. In this photograph, you can see the large cover for the air ducts either side of the nose. These were made from thick pieces of plastic card, carved down to a fine edge with a scalpel. You can also just see the pipe coming down from the left cover into the top of the exhaust. The outside lockers have been glued on further back on the mudguard, with the recesses for them on the mudguard filed flat. There are other C-version alterations which show better in other photographs (below).

The aerial is a piece of bicycle brake cable, with the ends splayed out, and with super-glue applied down the main twist of it, in an attempt to conceal the twists of wire. This should look okay once the aerial is painted. The base of the aerial is Milliput, and the aerial goes through a hole in the body burned with a hot pin, and into another putty box inside.

The kit has a single piece for the back of the vehicle. From this, the back doors have been cut, and they have been glued on at the angle which gave me the strongest join, with as much of the edge touching the main body as possible. The hinges are made from plastic card, and metal wire. You can also see a fire-extinguisher, complete with a strap made from transparent self-adhesive book-covering film.

The main radio is made from a sandwich of plastic card and Milliput, with details scored and punched on the front, and sculpted into the top and sides. Around this are two loops of wire, to represent the frame of the radio. Milliput was also used to make coats, bedrolls, man-pack radios, and other internal details.

Hanomag 251/3 with crew

The same vehicle, with its crew cartridge in place. The three crewmen are by three different manufacturers. Can you name them? You can see a large tarpaulin hanging on the right side of the vehicle, and that the front left (driver's) visor has been opened and glued sticking out. The seated crewman has pink piping on his uniform - the branch colour used by panzer grenadiers.

Early Hanomag 251/3 in bits

This is a model of an earlier version of the radio variant, with its large frame aerial. These were replaced with crow's foot aerials, once it became apparent that the frame aerials were too conspicuous, and drew too much fire. The vehicle is a B version. The frame aerial is wire, bent, and super-glued together, then re-enforced at the joins with good old made-in-Wales Milliput. The vertical poles enter the vehicle through holes burned with a hot pin. These holes are hidden by the Milliput rolls of tarpaulin down both sides. The arrangement of the radio inside is the same as with the later variant. On the right you can see the crew cartridge. The slot in its base is where it fits around the edge of the desk. The seated men fit on the benches opposite the radio and desk. I had to make the frame removable, so that I could get the crew cartridge in and out. If it proves a bit fragile, I might use more Milliput at the joins, and then hide these blobs with foliage.

Now for the finished articles.

Early Hanomag 251/3, completed

The extra big tarpaulins on the sides, with their splinter-pattern camouflage, are big enough to cover the big frame aerial. I have no proof that this was so, but it is a convenient excuse for my method of hiding the holes through which the wire of the aerial slots. I notice that the colour of the mud rather fortuitously matches that of the road.

You should just be able to make out the pink piping on the epaulettes of the standing crewman, and on the hat of the man on the left. This tells us that these men are panzergrenadiers. Above each man's right breast pocket is a pale Wehrmacht eagle, which tells us that these men are not SS panzergrenadiers. I wanted to make this clear. Many panzergrenadiers were SS troops, and there are gamers in my club who refuse to play with SS figures. While this may be going a bit far, I do question the good character of the occasional wargamer I meet, whose only wargaming army is an SS force equipped with King Tigers.

The bushes on the left are made from tiny pine cones which grow on trees in the suburbs of Newcastle, covered with flock.

Late Hanomag 251/3, completed

The later radio car. You can see the white ash-tray on the table, and the sand-coloured Afrika Korps hat worn by one of the crewmen. Afrika Korps veterans were often proud of their old uniforms, and hung on to them. The commander standing next to him is wearing a black panzer uniform. These were popular and high-status to wear and a lot of officers wore them even if they were not meant to by regulations. The brake-cable aerial looks the part and is very strong.

The camouflage pattern on the 251/3 is not one which I can guarantee was used on these vehicles, but it is certainly a possibility. One snag with painting camouflage on vehicles, is that it can hide their shape so much that they become ugly and difficult to distinguish on the table top. You can see that I have dry-brushed the Hanomag to bring out the edges and the shape of the thing. I used a pale sand colour, which resembles the base paint of the vehicle as it would look if the camouflage paint had worn off with wear.

Panzergrenadier companies had two VW cars attached to them. Here we see the Hasegawa Schwimwagen, with a  Wargames Foundry driver. Crates and oil-drums by Faust Studios.

251/9 75mm Stummel variant ▼

Hanomag 251 Half-tracks: 251/9 Stummel variant

Hanomag 251/9 variants

251/9 Stummels - "stump guns". To make these, you will need to convert your Matchbox kits to the C version, since earlier versions were not used for this variant. If you have a D version model, then your conversion to a 251/9 will be easier, since a late 251/9 had a gun mounted on top of the existing vehicle, instead of, as here, inset down into the vehicle, with parts cut away from the roof. The late version had a co-axial MG, but these earlier versions did not.

This photograph shows the converted nose of the kit. The nose-piece supplied with the kit has not been glued on, and the front edges of the side parts of the nose have been cut to form a straight line in profile. The B version had a nose with a bend in its middle. The C version had a slab flat nose, with a little rectangular bit on the bottom. Cut a piece of plastic card to fit over the nose and glue it on, then trim it down to size to fit exactly, then add the little rectangle at the bottom. Burn or drill a hole through the bottom centre of the main (roughly hexagonal) piece, or glue on a thin circle of plastic card to represent the cover to this hole (which was for the starting handle).

The front-most sections of the mudguard have been cut back, and a new lip carved on their edges, and to these have been glued the headlamps. Actually, the headlamps were on stalks, but I thought that the stalks alone would be too weak, so I glued the headlamps to the front edges of the mudguards. The headlamps themselves have a slit added to their front, and the backs of them have been filed to a hemisphere (on the B version they were more conical). When set in place, Milliput stalks have been added, which attach to the sides of the nose.

Note that the grille at the front of the bonnet (that's "hood" to you Americans) has been filled in with Milliput. I found that carving away the grille lines first helped a bit, to get the final effect nice and smooth.

From this angle, you can see that the 75mm gun, which was used for firing high explosive rounds in support of infantry actions, is set down into the vehicle, roughly where the front right visor was. Of course, the hole to accommodate the gun was wider than the gun, to allow for some amount of traverse. In the vehicle on the right can be seen the six-round bin to the right of the gun, on the inside wall. I do not know what this looked like, so have represented it with a simple box made from plastic card. Also, you can see the wheels, with their little handles, for aiming the gun, and the sight. Some of these vehicles had scissors scopes, with two eye-pieces, but I have opted for the simpler single periscope sight. The big guard looping around the breach is lower on the right hand side, to facilitate loading. This guard kept the crew out of the danger zone when the gun recoiled after firing. From it often hung a large bag for catching the cartridge casings.

Hanomag 251/9s from top

The same vehicles, from above. From this angle, you can see that the floor of the vehicle has been widened where the front benches have been removed, to meet the sides of the body, and it has be scored all over with diagonal lines, cross-crossing, to provide a grippy surface for the crew to stand on. Behind the one remaining bench is a seat back, which is also a locker. These were in all C versions of the 251, but my seated figures don't sit properly with them in place, so I have left them off my other models. Opposite the bench is a large ammunition bin, which stands on the flat floor, taking up a lot of room. At the gun-end of this bin is a smaller, lower bin.

With a keen eye, you can see that the holes in the shields for the guns are wider than the guns. This gap is covered by a second smaller shield behind the hole. You can also see some details of the breach. I made the main square part of the gun, together with the breach, as one piece, carved from a thick slab of plastic card (actually, three layers glued together). The guns were old StuG III guns, and their new use was such a success, that this type of gun, having been discontinued, was brought back into production. I have seen several commercial models of this vehicle, and some home-made conversions. The commercial ones were all very lacking in detail, and the conversions almost all used the short 75mm barrel which comes with the Airfix Panzer IV kit. This is the wrong type of gun, and of course the tank kit lacks the breach.

Hanomag 251/9s from side

The same vehicles, from the side. You can see the periscope sight, peeping over the shield, which I have made from quite thin plastic card. The gun barrels are two diameters of plastic rod. The roll of cloth shown on the right-hand vehicle is Milliput. Note the angle of the little shield at the base of the barrel. The main shield, and the extra shield behind it, can just be seen. The right-hand vehicle's extra shield is not quite at the right angle.

Note also that the right-side visor has been removed (left-hand vehicle in the photograph), and that there is a pipe from the vent cover to the exhaust. In this particular case, I have used a diameter of rod which is slightly too thin.

Hanomag 251/9s, finished models.

The finished models on a wargaming table. One of the two crew cartridges has dismounted, to give us a better look at the gun breech. The effect of the added detail on the edges of the tracks shows up well in this shot. I have painted a big black smoke stain on the bonnet. I don't know that this is realistic, but it seemed appropriate. The gun has no barrel brake and is close to the bonnet, so a smoke stain seems likely.

The road is my own road (see scenery section). The Spanish riders I made myself from girder strut, bought from a model shop, with little flat plastic card triangles for the strengthening bits, painted very rusty iron. The woodpile in the background is made from - you guessed it - twigs.

I was going to cover these models with loads of foliage, which would be authentic, but after going to all that trouble to detail the model accurately, I couldn't bring myself to do this.

251/10 Platoon command 37mm AT gun variant ▼

Hanomag 251 Half-tracks: PLATOON COMMAND 37mm A.T. GUN VARIANT

A panzergrenadier platoon had one 251/10 as a command vehicle. This mounted a 37mm anti-tank gun in the place of the front machine gun.

Hanomag 251 platoon

Here you see a full platoon of 251s. The 251/10 is clearly visible in the centre. I'll get to the command vehicle in a moment. First, a few comments on the others in the platoon. For wargaming purposes, I wanted them to be identifiable as belonging to the same platoon. Accordingly, though each has been painted in a different pattern, each shares the same proportion of colours. The three colours are the standard three: reddish brown, sand, and dark green. Late Hanomags were painted in a base coat of dark green, but most had sand as the base colour. On the left, you see a 251/1 with front mudguards removed, which was common, a towing cable wrapped round the front hooks (thick linen thread), sand bags in front of the MG (again, not uncommon), open driver's visor, and opened rear doors. The 251/1 on the right has a small fascine mounted on the front, which I saw in a photograph (wire bound with thread - heavier than the rest of the model). It also has big bits of wood (matchsticks) and a spare front wheel carried on the side. It also has the most effective camouflage scheme I have ever painted - transverse zigzags of the darker colours, with small dashes of lighter colour - disguises the shape of the vehicle amazingly. The furthest of the 251/1s has spare track carried on the nose, and you can clearly see one of the doors to the side storage bins, which has been cut off, bent, and glued back on as if hanging loose.

The 251/10 platoon command vehicle has a gun taken from a normal anti-tank gun kit for a German 37mm, mounted with a couple of added details like control wheels, with a  scratch-built shield. This is the latest of the shield styles, with its scalloped top edge, rivets, and missing right hand half. This was made with two pieces of plastic card cut to shape and glued on at an angle to each other. The edge of this card was painted with a dark line to represent the gap between the front and rear thicknesses of the real shield. Under the vehicle roof, was glued more plastic card to represent the mounting for the gun (not shown). The 251/10 is a C version - note the altered nose.

Crew for the vehicles by Skytrex, Wargames Foundry, SHQ, and Matchbox. In the background, you can see some ruins, looking much redder than in life, made from the brick walls which come with the Matchbox 251 kit. You can also see some dragons' teeth which were sold to me by Faust Studios as 6mm scale! Immediately behind the furthest 251 is a section of wall from the Matchbox Char B kit. I had two of these and glued them back to back to give me a proper double-sided wall. On one wall you can see the Waffen SS recruitment poster which used to come with the 251 kit, but which now has been replaced by a more PC poster.

Hanomag 251/10, middle version

Here you see a 251/10 in "ambush" camouflage scheme. It has the middle-period gun shield, which is low, but double-sided. This is the Fujimi 251 kit, and the gun came with the kit as an alternative part. I just cut the top section off the shield. Note the hatch on the front bonnet which is slightly ajar, and the open vision ports (easy to do with this kit, since the parts come as separate). In the background is an SHQ Kettenkrad and trailer, and an old Bellona pillbox.

Crew by SHQ and Esci. The Esci man is firing the rear MG. He is from the soft-plastic German infantry set, and fits perfectly.

251 rear view

Early 251/10, painted in panzer grey. This one has the same shield as the infantry version of the gun. Note that the doors I have glued open (having cut them out from the kit parts), and I have made hinges for them. The kit has a lot of mud on it, which turned dark and slimy-looking when I varnished over the top of it. You can see some on the interior floor. There are lots of other little tweaks: additions of various bits of kit here and there, and the viewing ports opened.

251 in bits

The 251/10 you have already seen, with the one-piece crew cartridge (figures are Matchbox, SHQ, Fujimi). Note the standing commander who is in mid-air, and the seated soldier with rifle who sits on nothing. These, when in the 251, are supported by the seats.

Complete 251 and crew

251/10 complete: the same vehicle, with the crew cartridge in place. Remove the crew and replace with hamster bedding (to represent dirty smoke) when the vehicle is destroyed. These last three pictures were taken with a digital camera, as opposed to the good old-fashioned film type. I know which I prefer, but digital cameras are improving fast.

251/17 AA variant ▼

Hanomag 251 Half-tracks: 251/17 2cm FlaK variant

Hanomag 251/17 variant

There were several different types of 251/17, and it is very difficult to get information on them. The only well-known and publicised type is the one made for the Luftwaffe, which had armoured folding sides. Only twelve were ever made, and only ten of these were armed, and all were used by the Luftwaffe. For my panzergrenadiers, I will have to model a different type. Here you see my two models of the type with the open unarmoured back. Almost all of these were on the D version chassis, and so I have modelled them as such. I think that these were not intended as front-line vehicles, but would normally be back in defensive positions, pointing their barrels into the sky, but towards the end of the war, the Germans got desperate, and pushed all manner of vehicles into service, and that's my excuse. In truth, I didn't find out about the more common panzergrenadier type until later.

The D chassis had a different type of side to the bonnet/nose. On the model on the left, the second one I made, you can see that I have carved down the model kit's nose, and replaced the sides with flat plastic card. On the other model, I have instead left the kit's sides in place, with just the little hatches filed off, and I have added a little extender piece of card to complete the shape. I think the model on the left is more successful. The front mudguards are cut back further than on the C version, and the headlamps are quite different - a hooded one on the left fender, and a cylindrical one on the right fender (sprue). The sides and back end of a D version were quite different from the C, but we don't have to worry about that here, because the entire back-end is rebuilt anyway.

Each model has a wide flat platform mounted on the back, with a short flight of steps running down from it into the cab. The details of the platform itself I have taken from the Luftwaffe version, which may or may not be accurate. This consists of four squares of plastic card glued down, each one with a disc on top of it. The whole of the platform is cross-hatched (lines scored in with a scalpel), but this doesn't show up in this shot.

The sides of each model fold down, and you can't really see how I managed this, so I'll have to write it. On the model on the right, the side pieces have tine plastic protuberances at the bottom. These fit into tiny holes burned into the thickness of the side walls at either end. This is very neat, but rather delicate. The model on the left has a much stronger solution to the problem. The side pieces are cut with extensions sticking out at the bottom, either end, and these are held in place, and allowed to pivot, by pieces of hollow plastic rod, which I have cut into a quarter of a circle, and glued firmly to the floor and inside walls of the vehicle. The little strips of thin card along the tops of the sides protrude a little at either end, so that the sides come to rest in the raised position with a satisfying click. I don't know whether in reality these folded-down sides would support a man's weight. They may not have been to stand on, but merely to get out of the way of the traversing gun. One model has sides made to look like wooden planking, and the other depicts a wooden/steel frame, with mesh in between.

At the back of each vehicle is a big bin, which runs most of the width of the vehicle. I assume that here was the ammo store. The ammo boxes and clips are by SHQ, made specifically for this gun. SHQ also made the stowage glued to the sides of the vehicles, and the gun and crewman you see on the left. For this photograph, though, the gun sits on the mount which comes with the Britannia 2cmm FlaK gun. My scratch-built gun platform sits on the floor in the picture, and is a fair bit more accurate and detailed than the rather crude Britannia model. The SHQ gun is far more detailed, but a little on the small side, and very fiddly to put together. The MMS model of this gun appears to be the best, although I haven't actually picked one up to have a look at it. The white-metal guns are far heavier than the rest of the model, and I discovered too late that they unbalance the model horribly - lifting the front wheels off the ground. To counter this, I had to chop up lots of little bits of metal and thread them into the front compartment of the model, in the nose. Now that you are aware of my mistake, you may wish to avoid it, and put some weight in the nose of the model before gluing it all together.

The spade and shovel on the left-hand vehicle are in the authentic places.

View of rear and underneath

I've got a horrible feeling that those two front seats should be the other way around. No matter. Anyway, on the right, you can see the underside of the model, which shows you just how much longer this variant is than the usual. Two long triangular supports strengthen the underside of the platform, and there is a step made out of thin rod and strip, either side of the rear end, to make it easier to get on and off the vehicle. Both models have their sides in the raised position.

The rear view shows the open ammo bin, a bucket hanging off the side, a man-pack radio (on the right, inside), and some stowage in what seems to me a logical place to put it - down the sides under the extended roof. You can't alas quite see the steps running down into the cab. These are a narrow flight, the width of the flat part of the bottom of the vehicle. Either side of the steps I have modelled as a simple slope. The plans I worked from don't make it clear what was here.

Finished 251/17s

The two finished vehicles, deployed with sides folded down. The crew is mainly SHQ and have had their bases painted to match the camouflage pattern on the vehicles. Some mud-mix has been smeared on surfaces which would be walked on by the crews. The further of the two Hanomags has the Britannia gun, which has a stocky barrel which can be glued at whatever angle the modeller wishes. The central gap in the gun shield was far too wide, and I had to narrow this by cutting, shaving, and re-gluing. The nearer vehicle has the SHQ gun, which has a more realistically narrow, but fragile, barrel, which can only be fixed at the angle you see here. Sometimes the barrels are pictured as having the same camouflage as the rest of the gun, and sometimes, as here, it is dark gun-metal.

The more common 251/17

Unfinished 251/17

This is the first stage towards modelling the more common type of 251/17. It seems that there are no photographs of the inside of this vehicle, so a fair amount of speculation is necessary here. I am particularly indebted to Jose Ventura of Portugal, for his help with this model. The body is a C chassis. The front benches have been removed, and the girders for a gun platform have been glued inside. Two horizontal girders span the width of the vehicle, and are fixed to the sides, immediately above the angle. Four vertical girders support these two horizontal ones. You can only see two in this photograph. I couldn't see the point in putting the front two in, since once the model is complete, they would be invisible. The vertical girders are as far apart as they can be on the flat floor. Two sloping girders attach to the front horizontal girder, and to the floor toward the rear of the vehicle. I have used T-section girder. The structure may have used L, H or U-section girders instead.

Next, this platform will be planked over, and a gun mounted on top of it. The roof above the driver has been cut back a bit to give the gun a bit more room.

After a few hours' work, this becomes...

Finished 251/17

Here stands the finished vehicle on the railway crossing. If it has broken down, then this may prove embarrassing, as the 11.45 from Ypres is due along in a minute or two. I am stupidly proud of the crew for this vehicle. These were made using the figures which come with the Matchbox kit. One is the gunner (middle figure), one is another gunner, with his legs cut off and glued back on at different angles so that he can sit up on the gun platform, and the last is the figure of the soldier jumping off the vehicle, with his lower foot cut and glued back on horizontally. All three are glued together in a single three-man lump, and fit very nicely. The left hand of the furthest figure curls over the rear MG. A single man couldn't work this gun very well, as it took small clips of ammunition, and used these up rapidly.

The girders that you saw pictured above have had plastic-card planks thrown across them, and the centre plank has had a simple hole cut in it, to take the pin under the gun's turntable. The mounting of the gun was tiny and entirely hidden by the turntable. I cannot tell from any of the pictures I have seen of the real vehicle, whether the gunner was seated on a seat fixed to the traversing gun, or whether this seat was removed and the gunner stood. I have considered that a standing gunner is more likely. I have included the smaller gun shield behind the first, but believe that this was often removed. The main gun shield I have cut to be narrower, to allow the gun more traverse. Even so, it still doesn't have much of an arc of fire. I'd have thought that an AA gun would need a wide arc to be of much use, and this suggests to me that this AA gun was used mainly in a ground role, although I have a photo of one clearly trained on the sky.

This vehicle was also used in place of the 251/10 platoon command vehicle. Indeed, on paper it was the late war official vehicle for this role, but there were not enough to issue to all units. Many instead had 251/10s or 251/1s.

251/21 AA variant ▼

Hanomag 251 Half-tracks: 251/21 "Drilling" triple AA cannon variant

This is a latish variant, which mounted old aircraft cannons, which I had thought had been removed from up-gunned fighter-planes, but now I'm told were newly made guns of the same type - they kept the old style gun in production for the new use. Some of these vehicles used 15mm cannon, and others used 20mm. The difference in the look of the gun at this scale is minimal. They were used against ground targets too, with great effect, although they could not depress below the horizontal.

Hanomag 251/21 variant

This is another C chassis version, as can be seen from the altered nose. The hull is raised slightly, by two vertical plates on the sides, and one sloping one at the front, which is slightly wider than the roof. The silvery mass you can see is some SHQ German infantry stowage items (helmets, gas mask canisters etc.), glued on. The metal box at the rear of the vehicle is there for no particular reason other than that I had the spare part. The guns can't depress that low to shoot it off anyway, so they may have used this space for stowage.

Hanomag 251/21 variant in bits

Picture showing internal detail. The front benches are removed, and the rear left bench is covered with ammo boxes. These have been completely remodelled since this photograph was taken, and now I have three much larger ammo boxes bound together by a simple strip, and standing on the floor. These are upright, all the same height, but one a bit wider than the others (for the central gun, which was harder to re-load), with square black holes in their tops, where the belts came out. I'm afraid I have no picture of these. The pedestal on which the gun rotates was made from the end of an old plastic pen. It is round cross-section, tapering at the top, and flared out a bit at the bottom.

Close up of turret top

Close up of the turret top, showing the triple guns. The guns are made entirely from plastic card and rod. The ends of the barrels are cut at an angle, sloping down and in, and the gun bodies are a sandwich of thin card outside thick. The gunner's head rests on a large pad, in front of which you can see the gun sight. The pad is attached to a upward-bent bar which connects to the two side shields. The shield has little strengthening parts in the front lower corners - little triangular pieces which look like the front bottom corners of a Panzer II, III, or IV. The front part also has a little cut-out for the gun sight. From the horrendous state of my fingernails, you can tell how much hard labour I've been doing lately. My fingers are bending the sides of the turret in slightly - they were not quite parallel.

Close up of turret bottom.

The underside of the turret. Under the centre part of the turret is a funnel-like piece (grey/green) which caught the falling shell casings, and guided them into the pedestal (after which they fell out the bottom of the vehicle?). Mounted on the top of this is the pivot which allows the gun to be raised and lowered. This was done by "body English", that is, without any gears or levers, but simply by the operator's leaning back or pushing on little stirrups fixed to the bottom of the pedestal. My crewman does not flex, however, so I omitted the stirrups. The hinge I made by threading a piece of thin rod through holes burned through with a hot pin.

The ammunition boxes resemble the boxes pictured in one source I had, while another suggested that the boxes were a great deal larger. The larger ones seemed to match the huge number of shells this was supposed to have when fully loaded, but seemed way too big to fit in the vehicle and allow traverse. The crewman is a Fujimi 251 passenger, with his legs cut off and glued back on wide apart.

This picture does not show as well as I'd hoped the cradle for the guns, nor the seat on which the man sits. You can just about make out the small white seat, like a big wide bicycle seat, glued to the backside of the gunner, and from this, a thin rod connects the seat to the cradle. The seat hangs on that rod suspended from the cradle. The thick piece of rod at the bottom you can see is the rod which slots onto the pedestal so that the model can rotate as well as elevate.

The finished vehicle

The finished vehicle. Standing behind the gun is an SHQ officer with binoculars, with the pink piping of the panzergrenadier on his hat. In the background is a  Dapol (once made by Airfix) windmill. The large ammunition boxes would have been suspended on hinges, so that they hung straight down at all times. This was impossible to model for a wargaming vehicle at this scale, so I didn't bother.

Converting B version to C version ▼

Hanomag 251 Half-tracks: Converting B to C.

The Matchbox kit of the Hanomag 251 is of the B version of the vehicle. If you want to make a C version, as you might if you were going to make a later variant of the vehicle such as a 251/9 Stummel, then you may find the instructions below useful. They do not address the internal differences, and confine themselves to the external appearance of the vehicle. C versions were more common than B versions, later in the war, and so for a later armoured personnel carrier this fact alone might justify the conversion. Besides, model-making is a hobby, and the conversion can just be done for the hell of it.

The Fujimi kit is also of the B version, and so much of what I say will work if you are starting with that kit. The Japanese kit is, however, twice the price of the Matchbox one, and the wheels are too small for authenticity. On the other hand, it comes with better decals, more detailed tracks, a 37mm gun for the 251/10 variant, a couple of seated figures (although the driver doesn't fit in his seat), and a couple of extra details, such as a towing pintle. Oddly, it has rubber front tyres, too.

Most of what follows is repeated in the text found on the pages detailing how to make the various variants of the 251, but here you get all the tips in one go.

  1. Remove the covers to the air vents on the sides of the nose. These are rectangular hatch covers moulded onto the side pieces in the Matchbox model, and separate pieces in the Fujimi kit. Make the area here nice and flat, because later you will need to glue a flat piece here.
  2. Remove the bars of the grille at the front of the bonnet ("hood" if you're American).
  3. Glue the back, sides, and bonnet of the vehicle together as normal. Leave off the front nose piece.
  4. Cut the front parts which would normally receive the angled front nose piece, such that they in profile form a straight sloping line. The slope is such that a bullet hitting the front of the nose would bounce upwards. Try to preserve the little hooks near the bottom.
  5. Glue a flat piece of plastic card over the end of the nose, above the hooks, and wait for the glue to set solid. Once solid, trim this piece to be flush with the sides and bonnet, and make the bottom edge straight.
  6. Add a small rectangular piece of plastic card to the bottom of the new (roughly hexagonal) nose piece, between the hooks.
  7. Drill or burn a hole through the centre of the bottom of the main hexagonal nose piece. This hole was for the starting handle. Alternatively, glue on a small thin circle of plastic card to represent the cover for this hole.
  8. Omit the front bumper. The C version didn't have it.
  9. The mudguards have several straight sections, such as the long one on which the three storage boxes rest. The front-most of these sections, where the headlamps go, needs to be cut back. Make it about a third of the height it is on the B version, and sculpt a nice edge on it.
  10. The mudguard on the C version has a slight (very slight) upward kink/curve in it. Bend the mudguards at the point where the two body halves were joined on the real vehicle. Find this point by looking at the main pieces for the sides of the body. Behind the visors on the side, you can see a vertical line, representing this join.
  11. The mudguards have a recess in them, to locate the storage bins. File away the edges of this recess to disguise it.
  12. Glue the storage bins on much further back, so that there is only a small part of the long section showing at the back, and so that the front end of the storage bins is near the upward bend in the mudguard.
  13. The recesses for the bins may show a bit even after careful modelling. Also, the bend in the mudguard can mean that the piece doesn't fit nice and flush with the side of the vehicle. If so, disguise these flaws with stowage on the mudguard. A roll of cloth is easiest, made with putty, such as Milliput.
  14. File the backs of the headlamps into a hemisphere, from the conical shape they have on the B version. I added a slit across the front of the headlamp too. This is not a difference between the B and the C, just a bit of extra detail for either.
  15. Glue the headlamps onto the new front edge of your mudguards. In history, the headlamps were supported on right-angled stalks which attached to the nose of the vehicle, but such stalks alone would be very weak on a model of this size.
  16. Make big vent covers. These are a strange shape, which pictures are better than words at describing. I used a thick piece of plastic card for each vent, carved with a scalpel to a fine edge, both cutting down from the top side to make the three-dimensional shape, and up from the underside, to make the bottom edge its proper thickness. Study the photographs. Glue these on the upper sloping parts of the sides of the nose.
  17. Add a pipe on the left side of the vehicle, which connects the exhaust (which is that odd-shaped part which sits in the lowest part of the mudguard on that side) with the vent on that side. Note that the vent covers overhang the sides, so this pipe can just disappear under the vent cover.
  18. With Milliput or some similar putty which sets very hard, fill in the recess on the bonnet where the grille was, and smooth the top surface so that the bonnet appears to be a continuous sheet of metal in that area.
  19. Also perhaps with Milliput, make right-angled stalks for the headlamps.

If you do the above, you will have a fair approximation of a C version. Another difference I know about is that the hubcaps on the front wheels were slightly different, but who is going to know? Slap a bit of mud on to hide this if you're worried.

One final tip I will give, has nothing to do with converting the model, but will improve a B or C version: add detail to the edges of the tracks. The Fujimi kit is fine in this respect, but the Matchbox kit has smooth-sided tracks, whereas in reality the tracks had a toothed edge to them. This extra touch makes a very big difference to the look of the complete model, so I highly recommend it. Get a pin, set it in a cork, then heat it in a candle flame, and then use it to burn notches down the edges of the tracks. You can space these notches accurately by putting one next to every hole on the centre of the track.

Thanks to the members of the Crossfire and Spearhead mailing list for help with my research, most notably Ingolfur Bjorgvinsson of Iceland, Greg Huffa of New Zealand, and Hauke Kueck of Germany.