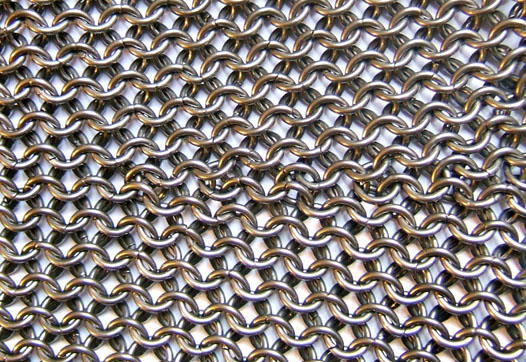
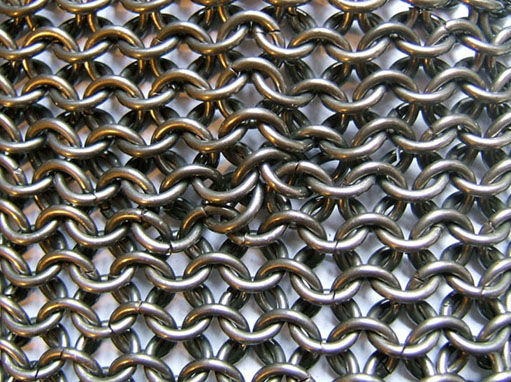
If you expect to get anywhere in the mail-making world, then you will need to know the basic linking pattern. Know first that this is the "European pattern", and that there are several "oriental patterns" which I'll not talk about here.
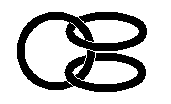
| Take one link and close it to form a ring. |
 |
| Link two links into that one ring. |
 |
| Now link the two new links to each other with another link. You now have four links, each linked to two others. |
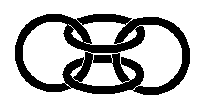 |
| Now expand the chain in the same direction with three new links. You could do this over and over again to make a very long chain, but I'll just show this much. |
 |
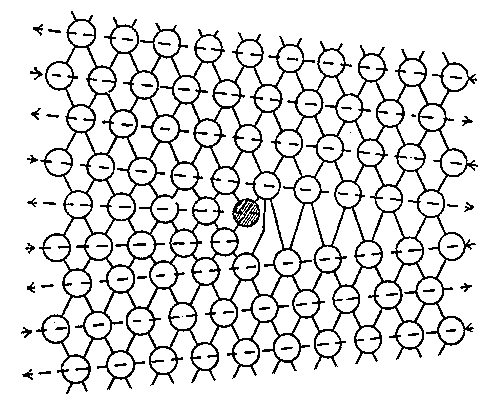
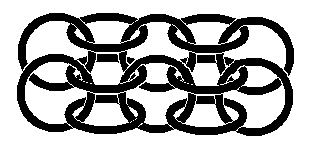
| Now the tricky bit. The diagrams here show the chain you have made, but they do not show you how it flops about, and how the rings are free to change alignment. Lay the chain down and get it into the shape as shown with seven links (above), then study this diagram which shows you how to expand in the other direction. |
|
Once you have built up a decent number of rows and columns, then the patch of mail you have made will start to behave itself when you lay it down, and the links will fall into line, but while the patch is small, the links are able to get themselves into quite a mess.
You now know how to start, and how to build up a patch of mail. Make a patch of just a hundred links or so, and keep it in your trouser pocket. After a few days of wearing those trousers, the patch will be polished (unless it is galvanised) into a beautiful silver shiny thing with which to impress all your friends.
European pattern involves every link in the centre of a piece of mail's being linked to four others. Those at the edges link to just two others. You could use this pattern to build an entire garment, but that garment would have to be composed entirely of rectangular shapes linked together. For a nice tailored fit, you will need to know how to expand and contract the mail.
Hold your patch of mail up by two corners. Let it hang from those. Now rotate the patch ninety degrees and hang it again. You will notice a difference. One way, it hangs as an open sheet; the other, it hangs quite differently, with the bottom free edge of the patch much shorter than the top edge which you are holding out taut. Get familiar with the fact that mail has a "grain" to it. When the bottom edge is shorter, and the lower part of the patch is a dense mass of metal, then the grain is running vertically; when the bottom edge is the same length, and the mail hangs with big gaps in it, the grain runs horizontally. In the last of the diagrams above, showing twelve links, the grain is running horizontally.
Often you will see mail reconstructed wrongly, with the grain of the mail running across the torso of a standing man. People often get this wrong because they like to see the mail hang open because they think it looks nice, and because this way, one can make a mail shirt with fewer links. This is the wrong way, because it is better to have a shirt which hugs the figure. With the grain running vertically, as it should, the shirt will contract onto the body of any man wearing the shirt, forming a dense mass of rings, giving him greater protection, and spreading its load over a wider area. With the grain horizontal, the links are sparser, and the mail hangs as a sheet of dead weight from the shoulders. The right way, and blows skid off the shirt; the wrong way and they may catch on the raised parts of the pattern. The right way, the shirt expands to fit over the wearer's clothing worn underneath the shirt; the wrong way, and the mail hangs with no ability to expand sideways.
To make a nice tailored shirt of mail, you will need to put in "expansions" and "contractions". These will give you subtle control over the shape of the garment, and the result will be more comfortable, better looking, and a lot more satisfying.
I shall now discuss expansions and contractions of the grain. Most expansions and contractions are of this sort, which is lucky, as they are much easier to do than those which go against the grain.
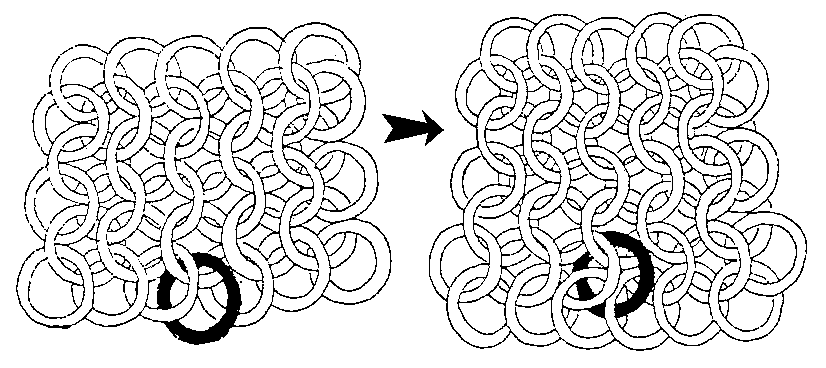
Here we see the grain of the mail running vertically down the page. On the left, we see that one link, shown solid black, links not to two other links, as a normal edge link would, but to just one other link. On the right, we see that the mail maker has added the next row of links, linking each to two links as normal. The result is an "expansion" with the grain. Two columns of links have become three.
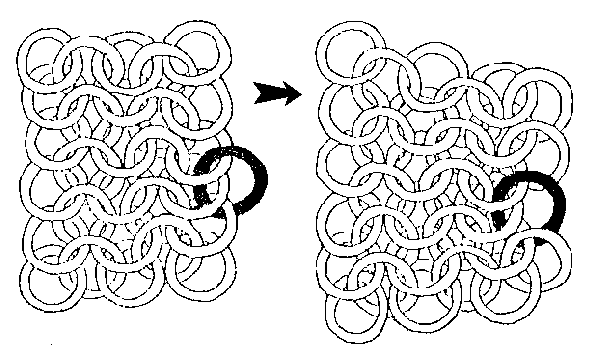
Here I have rotated the diagram deliberately, so that you will have to spot that the grain runs the other way, across the page. This is a contraction, and is the reverse of what we have already seen. On the left, we see that one edge link, shown black, links to three, not two, of the edge links in the next row. On the right, we see that it is possible to carry on the rest of the pattern as normal, and three columns have become two. Peasy.
Here you see an area of expansion in my byrnie. On the right, for even greater clarity, I have coloured the rings that link to five rather than the normal four in red.
 MAIL ARMOUR MAKING