 MAIL ARMOUR MAKING
Materials and equipment
While I have enough source material to tell you how to go about making a piece of riveted mail armour, I am not going to tell you that. I shall assume that you are going to make butted mail. While it is true that most period mail was riveted, some wasn't, so you can silence your critics with this fact. The main reason that I am going to concentrate on butted mail, is that it takes at least four times as long to make riveted mail, and since it takes blinking ages to make mail of any kind, and since these days we all have e-mails to catch up on, and television programmes to watch, the number of people out there making riveted mail has dwindled to near zero.
To make mail, you will need:
Time
Making mail takes a lot of this. My mail byrnie is made from 6mm diameter links. Each link took me about 15 seconds to link to the others, that's four a minute, around 240 an hour, assuming no hesitation for checking the pattern, and nothing going wrong. My byrnie has in the region of 30,000 links, so if you were able to link at this speed, it would take you 125 hours. Life isn't like that, and you must spend some while working out the pattern, relinking mistakes, researching, rubbing your calluses, and with all this taken into account I'd say that 200 hours is more accurate. So, if you did an hour every night without exception, it would still take you most of a year. I'm not trying to put you off. I'm just trying to let you know what you might be letting yourself in for.
Of course, you could save time by making a smaller garment, making a particularly simple garment, and most effective of all, using bigger links. The bigger your links are, the fewer you will need. One man I know who made riveted mail, estimated that it took him up to two minutes to do each link. Period mail was not made by individuals, but by teams. In addition to time, I could have listed patience and stupidity. To make a little patch of mail might only take you an hour or two, and it is a very nice thing to have, serving well as a key-ring fob, or as a superior alternative to Greek worry beads, for demonstrating what the armour was like for educational purposes, or just as a conversation piece.
Pliers
For most linking, two pairs of decent quality blunt-nosed pliers will be quite adequate. If you use very unusually small links, then you may need some needle-nosed pliers, and if you use massive links, then you may get on better with adjustable spanners (that's "monkey wrenches" to you Yanks).
Links
There are three main methods of getting links.
- Use split-ring washers. A split-ring washer is a piece of good-quality springy steel, designed for a purpose quite other than making mail. From the right kind of hardware shop, it is possible to order these by the thousand or by weight. The advantage of washers is that they are the easiest type of link to get hold of. Disadvantages include: they tend to be rather square in cross-section. Those that are very square are no good (the mail will not flex properly), while those that are a bit rounded are still less good than links made from round-section wire; the proportions of the washers does not match the ideal proportions in all sizes - for instance I found some very nice 6mm washers, which were of the right proportion, but when I ordered some 12mm diameter washers, these proved to be far too chunky.
- Make your own. Get some wire, wrap it around a rod to make a spiral, then cut the spiral up into links. I used a lathe to wrap the wire around a steel rod, then transferred the spring-like coil to a piece of wooden dowel. I then put the dowel in a vice, and sawed off a few links at a time from one end. This is a slow process. Quicker is to use a stout pair of clippers to clip the links off the coil, but this will not give you links with nice flat ends which butt together nicely, but will instead give you links with squashed ends and burrs which will make the garment very scratchy to wear, and a fair bit less strong. If you use galvanised wire, then your armour will not rust, but I would recommend ungalvanised, because it is more authentic, looks better, and if you care for your mail, rust should not be a problem. Also, if you plan to brown your links (see below), then you may find that the galvanising layer flakes off.
- Get a factory to make you some. This is the best solution, though it involves some trouble. My father, who has links to the metallurgical industries, helped me here, when he found a factory near Birmingham which makes springs. They already had the machines capable of wrapping wire into long tight coils, and cutting these coils into washer-like links. I ordered enough links for seven suits, since the more I ordered, the cheaper the links were per thousand. I sold six suits' worth of mail in next to no time (though it was a risk), for one and one and a sixth times the cost of the links, and so ended up with a free suit of mail (minus labour). For no extra cost, the factory "browned" the links for me (see below).
Whichever way you pick for getting hold of links, be sure to test a small number first before you commit to many thousands of them.
A pattern
You should have some idea of what you are going to make. To make a garment, you could make the pattern up as you go along, but for the best tailored fit, some plan is best. Look at my garment pattern section for help with this, but to understand it all, you will first need to understand linking patterns.
Browning
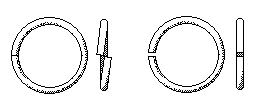
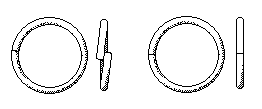
It can be well-worth the trouble getting your links "browned". This process, so-called because it makes steel go slightly brown, involves putting metal in an oven for a bit, and heating it up, and then letting it cool at just the right rate. The effect of this is to relax the stresses in the metal. If you don't do this, then you may find that when you open a link, which has been made by coiling wire, the wire takes the opportunity to release some of its internal stresses, and when you twist the link closed again, there is an annoying gap between the ends of the wire, because the wire of the link has straightened out slightly. If your links have such internal stresses in them, and you brown them, then they will come out with over-lapping ends, which may alarm you. Fear not. When you open the link and close it again, you will find that the ends of the link now butt up against each other without a gap, and the closing of the link happens with a satisfying click as the ends snap into place. Some links will benefit from browning, other won't. You will have to find out if yours will yourself.
 |
 |
| Here we see unbrowned links, shown in profile, and end-on. On the left is the link before it has been opened, and on the right the result of opening it, and then closing it again. Whereas the link appears to butt perfectly before the linking process, once the link is made, a gap appears. It is possible to close this gap, but it takes a lot of force applied with the pliers, and you risk breaking the link. |
Here are browned links. When they come out of the oven and have cooled, they have ends which overlap, but when one opens such a link and then closes it again, the effect of the browning and of the opening and closing cancel out, and the link butts together exactly. |
|