This scenario was written for World Crossfire Day and at the time of writing this page has been played twice. In World Crossfire Day victory was very decisive and was achieved by the defenders, with all the tanks in the column making it across the table, and the second game was a decisive victory to the attackers, with none of the tanks making it across.
Important: This scenario works best if the player commanding the attacking forces is kept in the dark about all the details. It would work even better with both players in the dark about the arrival of the tanks (this would require an umpire), but if one player is ignorant, it should be the attacker. It is still perfectly playable when both players know the entire scenario, however. The wording of this scenario shall assume that it is late 1944 France, the defenders are German, the attackers British, and that the German player is aware of the full scenario, and that the British player has been kept in the dark. All of these details could of course be changed by you.
Overall situation:
It is 1944 and the Germans are on the retreat. Allied forces are pressing forwards and hoping to encircle pockets of the enemy and force surrenders on a large scale. The Germans, though being forced back, are still resisting well, and have not collapsed. The allies must advance quickly if they are to catch large numbers of Germans before they can retreat and regroup. Time is pressing for both sides.
Table set up:
The usual mix of terrain for the countryside: fields, hills, woods, fences, walls, hedges etc. A road runs lengthways down the middle of the table (but not in a straight line, there must be at least three swerves in the road) from the allied (west) end to the German (east) end. In positions covering the road are three fortifications suitable for emplacing AT guns (with space in each for one stand of infantry if desired). The German defender player places these wherever he wants, covering the road. Their function is to deny the road to the enemy. He must place at least one in his home third of the board, and at least one in the centre third of the board. The road is placed first, then the fortifications, then the rest of the terrain (terrain such as hills and rough ground may be placed under the fortifications), with enough to cover about a third of the table. Players place these alternating, starting with the attacker, but neither player may place sight-blocking terrain features between the road and a fortification such that the AT gun in it can no longer see the road.
After all other terrain features have been placed, a terrain feature (perhaps a building) is designated in secret by the German player as a mine store. This goes where he chooses in the central half of the table (i.e. not in the western or eastern quarters of the table). The mines will only be discovered by British troops if they are in the feature when there are no Germans there. There is no need to tell the British player that mines can be laid during the game. He'll have to think of that himself.
British brief:
You have advanced at great speed as part of the operation to encircle the Germans. Your objective is to clear and hold the road ahead. Intelligence reports say that there are fortified points along this road, and these could be a menace to any columns we try to send forward in this area. We don't know exactly where they are on the map, but freed slave labourers have told of working on them. Proceed east along the road until you come to a fortification. As soon as you take a fortification, radio in and report its location so we can add it to our maps.
You have in your command:
1 x BC (+1) with radio team (regular)
2 x HMG (regular)
2 x FO for off table 81mm Mortar (12 FM each)
1 x Assault Engineer Platoon (veteran)
+1 PC, 3 x Assault Engineer Rifle Squads, one with PIAT.
Note: These chaps get a +2 in Close Combat: +1 for being assault engineers and +1 for being veteran. They can remove minefields.
2 x Rifle Companies (regular)
1 x CC (+1) with radio operator.
1 x on-table 50mm Mortar (8 FM)
3 x Rifle Platoons: PC (+1), 3 x Rifle
Your forces enter the table from the western edge. You start with the initiative.
German brief:
Hold the road. German forces west of you are in retreat and need this road to be clear of enemy. Do not block the road until you sight allied armoured vehicles, at which point feel free to destroy any that you can see. You have no BC - he's away at a staff training day. You may deploy hidden.
Forces
1 SMG Squad
3 x HMG
2 x FO for off-table 81 mm Mortar (24 FM total - from common pool of ammo)
1 Infantry Company
1 x CC (+2)
2 x HMG
1 x Rifle Platoon: PC (+2); 3 x Rifle, all with early panzerfaust
3 x Rifle Platoons: PC (+1); 3 x Rifle, all with early panzerfaust
3x Pak 40 AT guns, in the three bunkers. These are equipped with a plentiful supply of AP shells, but only enough HE shells each for two shots in the game.
Mine laying:
One German rifle stand can carry enough mines for one field. The Germans can lay mines across the road or anywhere else they want, by carrying them there and rolling 1d6 once per initiative. They have been trained for this. On a 5+ the job is done. The roll does not risk the initiative. The British player needn't be told why the German player is making a roll, but seeing that the German player keeps making rolls, he will guess that something is afoot. The British, being less familiar with the mines and not ready for the task, need to roll a 6, except the engineers who also need a 5+. There German player may lay a maximum of three minefields. These mines will be easy to see and clear, because they will not be well concealed or dug in properly (only attack engineers on a 1, other troops 4+), but they would be as effective as usual against fast-moving vehicles trying to escape.
Clock:
The game starts at 1215, at the end of every allied initiative, 1d6 is rolled and the clock advances five minutes on a result of 4+.
At 1315 the allied player receives this radio message (unless he has lost all his radio operators):
"German armoured column spotted heading east along the road towards you. Must be some stragglers that we didn't know about. Can you do anything to stop it? Have you captured any anti-tank weapons? ETA 10-20 minutes."
At 1330 the situation suddenly changes.
1330: Convoy
At 1330 a great rumbling of tracks and engines is heard, and a German armoured column enters from the west end of the table on the road. In the column there are: 2x Pz III, 3x Pz IV, 2x Stug IIIs, 1x Tiger (or some rough equivalent of this, depending on the figures you have).
The German player controls these vehicles, but he is very limited in what he can do with them. The road is good going, but off-road the ground is treacherous. Every linear move action (not pivots) taken off road requires a 1d6 roll and if the result is a 1 the vehicle is bogged, and there are no ARVs to recover them.
The top priority for the vehicles is to escape. Victory in the game is measured by how many of these AFVs can exit the east edge of the table.
The main reaction to an encounter with the enemy is to put the foot down and race away. The vehicles enter the table unaware of the presence of British troops in the area, and moving at top speed. They will stay on the road until encountering a very good reason not to. A vehicle may only shoot at enemy forces who are blocking its way or who have fired at it. Unless German troops move to contact with a vehicle to tell the crew about a mine field, the tanks will never see a mine field until they drive into it.
Using captured weapons
There is no need to tell the attacker that he can crew ATGs - better to wait for him to ask. If the British player specifies that he is destroying the AT guns, let him! Normally an ATG is taken out of a game by combat with its crew. An ATG can be destroyed by troops in base-to-base contact with it, if they wish. However, do NOT entrap the British player, however, by asking him if he is destroying the guns. It is for him to come up with this mistake on his own.
For every German infantry rifle stand killed, the British can get ONE shot with a panzerfaust. This simulates the chance that someone picked some up and knew enough about how to use them to give it a go. The normal stats for a Pak 40 are +1 +1 4d6/2SQ HE, but with allied replacement crews the stats reduce to +0 +0 3d6/1SQ HE to simulate the crews unfamiliarity with the weapons and the art of placing a shot for maximum effect.
Victory
The game ends when the fate of the German armoured column has been decided. Each will either exit the eastern edge of the table or be destroyed/bogged. Count up the AFVs that exit the eastern edge of the table and give these points to the German player. The points for the rest of the AFVs go to the British player.
Tiger (or equivalent heavy tank): 2 victory points.
Other tank/AFV: 1 victory point.
More points can be scored by either side by being in control of the following assets:
Mine store: 1 victory point (if the British player never found the mines, the point goes to the Germans).
ATG fort: 2 victory points.
British casualties are not totally irrelevant. Some troops are rare and vital for tomorrow's action.
Veteran assault engineer rifle stand: 1 victory point (if killed, point goes to the Germans, if living, to the British).
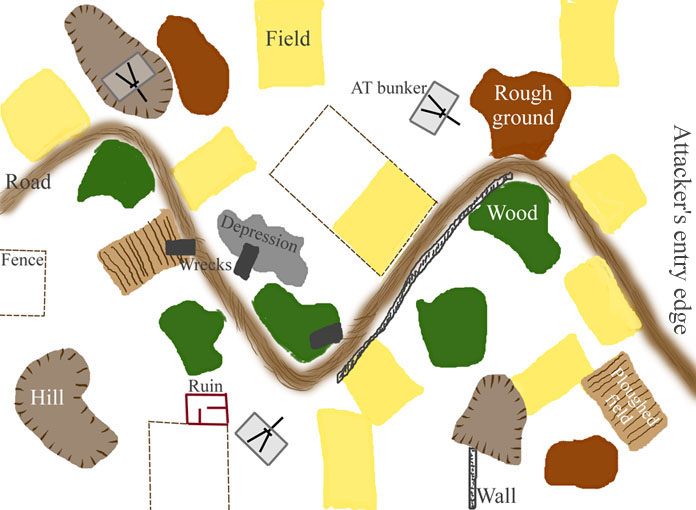
Above is an example map, as used in the second playing of this game. The road swerves three times as you see, and in this example the defending player has placed all three ATG bunkers where they can look down the length of a section of road from one curve. The attacker has placed quite a bit of terrain to enable him to get on from his entry edge without being shot to bits, and he added the three woods in the insides of all three road curves. The defender put his rearmost ATG on top of a hill, where it can see over the field in front of it to the road. The mine store was the ruin (rough ground) towards the bottom of the map. Ploughed fields (out of season fields - do not block sight) and fences (a move action to cross, otherwise have no effect) have little effect and were added partly for decoration, but also to deny areas of the board to the other terrain-placing player. Only after I drew this graphic did I notice that I should have drawn it the other way up, because the attacker should enter from the west.