This scenario was originally written as Game#1 of World Crossfire Day. In that event, each game had knock-on consequences for games that came later, and the scoring system was designed to reflect the game’s effect on the overall campaign. The victory conditions that appear here are an attempt to translate the scenario into a one-off game.
Important: This scenario has a twist in it which should be kept secret from the defending/British player. If you intend to play this scenario, then either you should have an umpire, or else, once you have read it, you must play the attacker/Germans. In case your opponent complains later that he was unfairly kept in the dark, you might like to print out a copy of the scenario so that you can then show it to him, and then he will then see that I, and not you, were responsible for the secrecy, and that he was not meant to know everything about the scenario.
Situation
This scenario could of course be adapted for different fronts of the war, different year, and different nations involved, but as it appears here, the British are defending their new line against a German counter-attack. The British have had to fight hard to gain this ground and don’t want to lose it. After their rush forward, they are spread a little thin.
Table set up
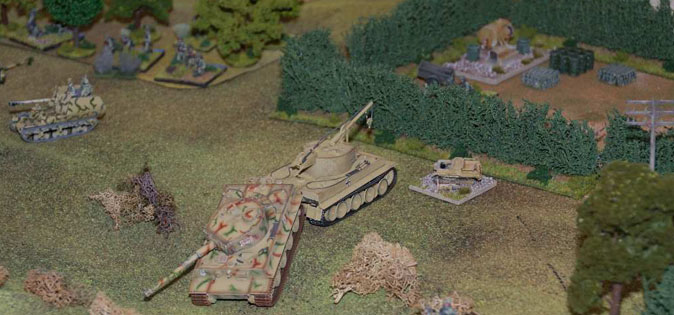
6’ by 5’ countryside. Usual mix of hills, depressions, woods, fields, fences, walls, crests, hedges etc. One depression to be situated roughly in the centre of the table. A Tiger tank is to be placed with its rear end sticking up out of the depression, and its front end down in the depression. The rear end should be closer to the German entry side. The two entry-ends of the table are 5’ long. From the edge of its deployment area, the British side should have at least a couple of features from which it can see the depression with the Tiger in it, but there should be terrain making it impossible to deploy all along the front with LOS to the Tiger. Elsewhere on the table, are a few more wrecks (these are to make it less obvious to the British player that the Tiger is the objective). From the German entry end of the table to about two-fifths of the way across, the terrain should be such that any path from the Tiger to the edge must pass through terrain features or have at least three pivots in it. The most open area of the table should be a swathe containing the depression. This should not be completely open, of course.

Here is what the table looked like when the game was set up by John Moher in New Zealand:
On the right, in the corner just out of shot, there were some ruined buildings.
Game clock
At the end of every British initiative, roll 1d6. On a roll of 5+ the clock advances from 0600 by 10 minutes. This is only important if you are going to be very precise about deciding who won the game (see victory conditions, below).
British (defender) brief
Troops from another battalion of your regiment have taken your current position from the enemy in a surprise dawn attack. They suffered some casualties in the action, and have missed a night’s sleep so have been withdrawn and your men have come forward to replace them and set up for the inevitable German counter-attack. You have not had time to dig in. Annoyingly, all the battalion’s Vickers MMGs have been assigned to a different area, but you do have some carriers for MG support.
You may deploy hidden anywhere from your base line to one-third of the way into the table from there (a 5’ x 2’ area). Hold the line.
Starting forces (all regular) [victory point values in square brackets]:
2x 6pdr AT guns [VP 5 each] (with the German player’s agreement, the stats of these could be altered from the official ones, perhaps to as much as +2 ACC +1 PEN, but a compromise is reasonable. The official -1/-1 is difficult to justify, so perhaps 0/0 is about right. 6 pdrs were very good AT guns, especially when they had the best ammunition, and compared well with Panther guns) The 6pdrs can be manhandled by a crew one base depth per initiative but may not be moved and fired this way in one initiative
Two Lloyd carriers [VP 4 each], which can tow the 6pdrs.
One company leg infantry, with CC (+2 for rallying, +1 close combat, all other officers +1 for everything). [CC 11; PC 4, rifle stand 4, 2”mortar 2]
One sniper [3]
Two universal carriers with MG [6 each].
One mortar carrier [4]with 3” mortar and crew, with FOO [5] and 16FMs.
Reinforcements
In addition to these forces, you have a field telephone fixed at your Coy CO’s deployment position and a runner with a jeep who can be sent off table to summon reinforcements. If you cannot use the ’phone or the jeep for some reason, your Coy CO can run off table himself. The 1d6 roll to summon reinforcements is 3+ on radio, 4+ with runner, 5+ in person (you are on foot and take longer). You cannot summon reinforcements until you have personally (the Coy CO’s figure) sighted the enemy. The roll does risk the initiative.
N.B. summoning these reinforcements may mean that they will not be available for use elsewhere on the front, especially if you summon them and lose them! You do not have to summon all of them at once, but if you later require more, you must make the 1d6 roll again.
These enter from your end edge of the table, and since they must move to do so, cannot of course be hidden.
One leg rifle company [VPs as above]
One engineer section [VP 5]
One 3” mortar carrier with crew and FOO [VPs as above].
Two 6pdrs with Lloyd carriers [VPs as above]
Two Sherman 75mm tanks [VP 12 each]
One Daimler armoured car [VP5]
German (attacker) brief
You start with the initiative.
Your main objective is the recovery of the Tiger. Unfortunately for you, Tiger engines are very noisy, especially when starting up, and there is no chance that you will be able to recover the Tiger without all troops on the table’s being able to hear the engine noises. Whether they put two and two together is another matter.
To recover the Tiger, you need to get your ARV next to it, and hook up and tow it out of the depression. If both vehicles are out of LOS to the enemy, then you need only roll 4+ on 1d6 (one roll per initiative max., failure does not lose the initiative – these conditions apply to all towing and repair rolls), but if there are British forces with small arms in LOS of either vehicle, then you will need to roll a 6 to hook up.
Once hooked up, you can in the following friendly initiative start to tow. A roll of 5+ on 1d6 means that the Tiger is towed out of the depression. Once on the flat, a roll of 3+ moves the Tiger one move action, or if in terrain, a roll of 5+ to move through terrain by the length of the Tiger and ARV models combined.
You have a crew for the Tiger in a lorry, with some fuel cans too. If you can get them to the Tiger, they can climb in and try to operate it. It is possible to climb in to the Tiger through front hatches that are in the depression such that only fire from the lip of the depression or a hill can be effective in stopping the crew from climbing in. Once in, on the following friendly initiative they can try to start the engine OR repair the turret traverse. The turret traverse motor can be fuelled and repaired on a 5+. If repaired, the turret turns as normal. If not, it turns a maximum 45 degrees per initiative, and has a reactive fire arc of 45 degrees in total, and suffers -1ACC to the first shot fired at any target. The Tiger has 3 AP shot and 8 HE shots left. The HE shots have a PEN of -1 in this scenario (a crew hit by a Tiger shell may bail out in panic before it realises that the shot didn’t penetrate). The crew can instead try to repair the main engine by rolling 5+. If the main engine starts up, this is VERY noisy and the sound must be reported to the British. If the engine is repaired, all towing rolls gain +1 (it is impossible to get the gearbox working properly, and so the engine only gives a bonus to towing, and does not enable the Tiger to move independently).
The ARV Tiger also moves noisily and all moves by it (even those screened by smoke) must be reported to the British.
If you can get the Tiger off your base line, then you are free to withdraw your forces. If you can inflict casualties on the enemy, this is a bonus, but the mission should not be put in jeopardy by risky attempts to inflict casualties.
Forces
[Victory point values in square brackets - these are how much the enemy scores when you lose these forces]
1 Tiger ARV (armoured recovery vehicle, with no gun) [VP 20].
1 lorry with driver [2] and tank crew [6], plus fuel cans.
1 BC +2 [20].
Two regular leg infantry companies [PC+2 8VP, PC+1 5, rifle stand 4] with no heavy weapons. Two bases armed with Panzerschreck [+2] (if you use separate bases for these, two bases [2 each]).
1 FOO for 81mm off-table mortar with 18 FMs [5](must specify before game start what proportion is smoke, and what is HE. If this FOO is killed, the BC can order a replacement be sent. To do this, he rolls 1d6 and on 5+ gets his replacement the following friendly initiative, and this roll DOES risk the initiative. If the BC is dead, tough).
1 MG Platoon with 1 +1PC [4], 2 MMG Squads (bases) [5 each].
2x Lorraine Schlepper SP PaK40 [10 each] (these are tracked turretless vehicles with decent 75mm guns, but light armour. You may of course use some rough equivalent.)
Tactical note
This scenario hinges on how quickly the defender realises that he has to advance from his cosy hidden positions. If he just sits tight, the Germans will have little trouble getting the Tiger off. But to advance against superior numbers, the British will almost certainly need reinforcements, but how many?
Victory conditions
The game ends when either the Tiger is destroyed or it exits the German edge of the table.
If the British can stop the Germans from recovering the Tiger without using any reinforcements, they score a decisive victory. If the Germans can recover the Tiger with little loss, they win. You could just discuss amongst yourselves who won and by how much at the game’s end, but if you want an official-seeming way of calculating victory, then here goes, but don’t say I didn’t warn you:
Calculate the points for the prime-objective-winning side only. If the Tiger is recovered, the Germans are the winning side, if not: the British. The result of this calculation can be a negative score, in which case losses sustained and time taken etc. can turn the victory into a defeat.
Tiger destroyed: 30 points to the British.
Tiger recovered: 50 points to the Germans minus 3 per time increment that passed on the game clock.
Add up all losses sustained and subtract from total, add up all losses inflicted, and add to total.
British player adds up points value of all potential reinforcements that were never summoned, and scores one third of their VP value (if Germans won, subtract this from German score).
If the score of the objective-achieving side is positive, it has won the game. Degrees of victory are:
>100 points = crushing victory
>50<100 points = decisive victory
>25<50 points = victory
>0<25 points Pyrrhic victory